
本篇目录
目录里每一条都可以点开直达对应章节;右侧(移动端为悬浮按钮)的「文章目录」也会列出同一批标题。
31 Python语言进阶
重要知识点
-
生成式(推导式)的用法
prices = {'AAPL': 191.88,'GOOG': 1186.96,'IBM': 149.24,'ORCL': 48.44,'ACN': 166.89,'FB': 208.09,'SYMC': 21.29}# 用股票价格大于100元的股票构造一个新的字典prices2 = {key: value for key, value in prices.items() if value > 100}print(prices2)说明:生成式(推导式)可以用来生成列表、集合和字典。
-
嵌套的列表的坑
names = ['关羽', '张飞', '赵云', '马超', '黄忠']courses = ['语文', '数学', '英语']# 录入五个学生三门课程的成绩# 错误 - 参考http://pythontutor.com/visualize.html#mode=edit# scores = [[None] * len(courses)] * len(names)scores = [[None] * len(courses) for _ in range(len(names))]for row, name in enumerate(names):for col, course in enumerate(courses):scores[row][col] = float(input(f'请输入{name}的{course}成绩: '))print(scores)Python Tutor - VISUALIZE CODE AND GET LIVE HELP
-
heapq模块(堆排序)"""从列表中找出最大的或最小的N个元素堆结构(大根堆/小根堆)"""import heapqlist1 = [34, 25, 12, 99, 87, 63, 58, 78, 88, 92]list2 = [{'name': 'IBM', 'shares': 100, 'price': 91.1},{'name': 'AAPL', 'shares': 50, 'price': 543.22},{'name': 'FB', 'shares': 200, 'price': 21.09},{'name': 'HPQ', 'shares': 35, 'price': 31.75},{'name': 'YHOO', 'shares': 45, 'price': 16.35},{'name': 'ACME', 'shares': 75, 'price': 115.65}]print(heapq.nlargest(3, list1))print(heapq.nsmallest(3, list1))print(heapq.nlargest(2, list2, key=lambda x: x['price']))print(heapq.nlargest(2, list2, key=lambda x: x['shares'])) -
itertools模块"""迭代工具模块"""import itertools# 产生ABCD的全排列itertools.permutations('ABCD')# 产生ABCDE的五选三组合itertools.combinations('ABCDE', 3)# 产生ABCD和123的笛卡尔积itertools.product('ABCD', '123')# 产生ABC的无限循环序列itertools.cycle(('A', 'B', 'C')) -
collections模块常用的工具类:
namedtuple:命令元组,它是一个类工厂,接受类型的名称和属性列表来创建一个类。deque:双端队列,是列表的替代实现。Python中的列表底层是基于数组来实现的,而deque底层是双向链表,因此当你需要在头尾添加和删除元素时,deque会表现出更好的性能,渐近时间复杂度为。Counter:dict的子类,键是元素,值是元素的计数,它的most_common()方法可以帮助我们获取出现频率最高的元素。Counter和dict的继承关系我认为是值得商榷的,按照CARP原则,Counter跟dict的关系应该设计为关联关系更为合理。OrderedDict:dict的子类,它记录了键值对插入的顺序,看起来既有字典的行为,也有链表的行为。defaultdict:类似于字典类型,但是可以通过默认的工厂函数来获得键对应的默认值,相比字典中的setdefault()方法,这种做法更加高效。
"""找出序列中出现次数最多的元素"""from collections import Counterwords = ['look', 'into', 'my', 'eyes', 'look', 'into', 'my', 'eyes','the', 'eyes', 'the', 'eyes', 'the', 'eyes', 'not', 'around','the', 'eyes', "don't", 'look', 'around', 'the', 'eyes','look', 'into', 'my', 'eyes', "you're", 'under']counter = Counter(words)print(counter.most_common(3))
数据结构和算法
-
算法:解决问题的方法和步骤
-
评价算法的好坏:渐近时间复杂度和渐近空间复杂度。
-
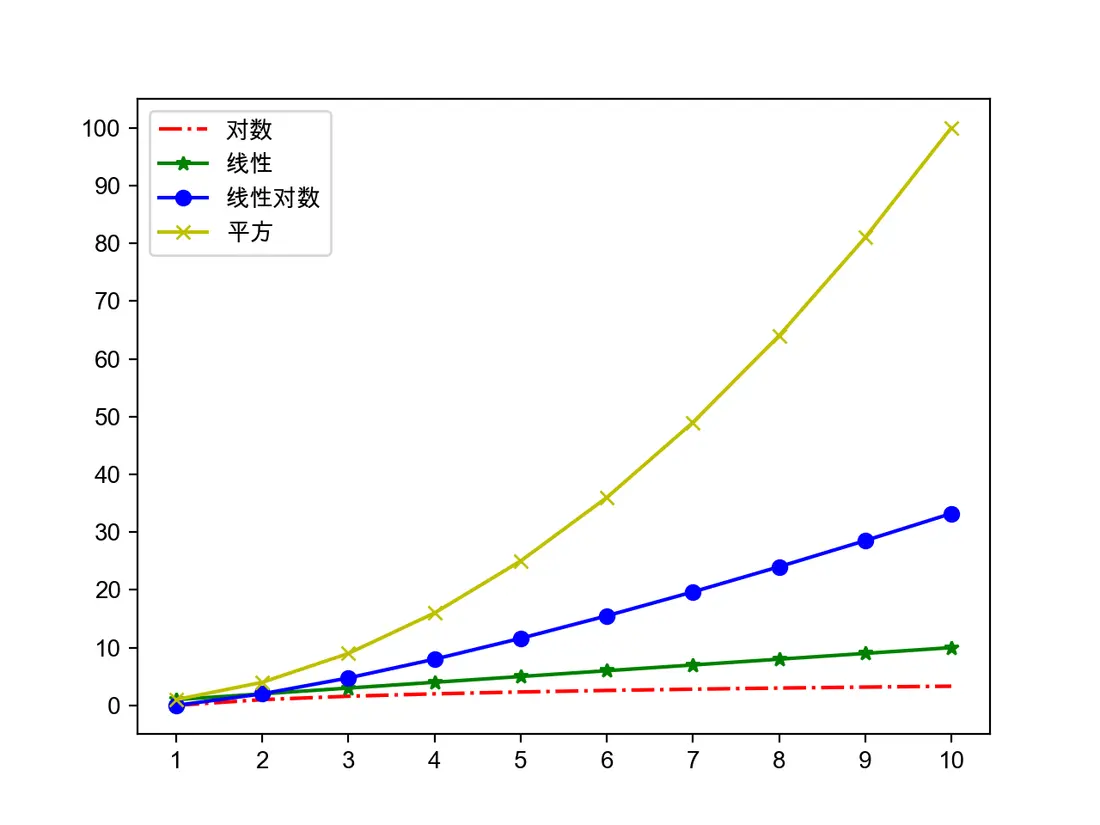
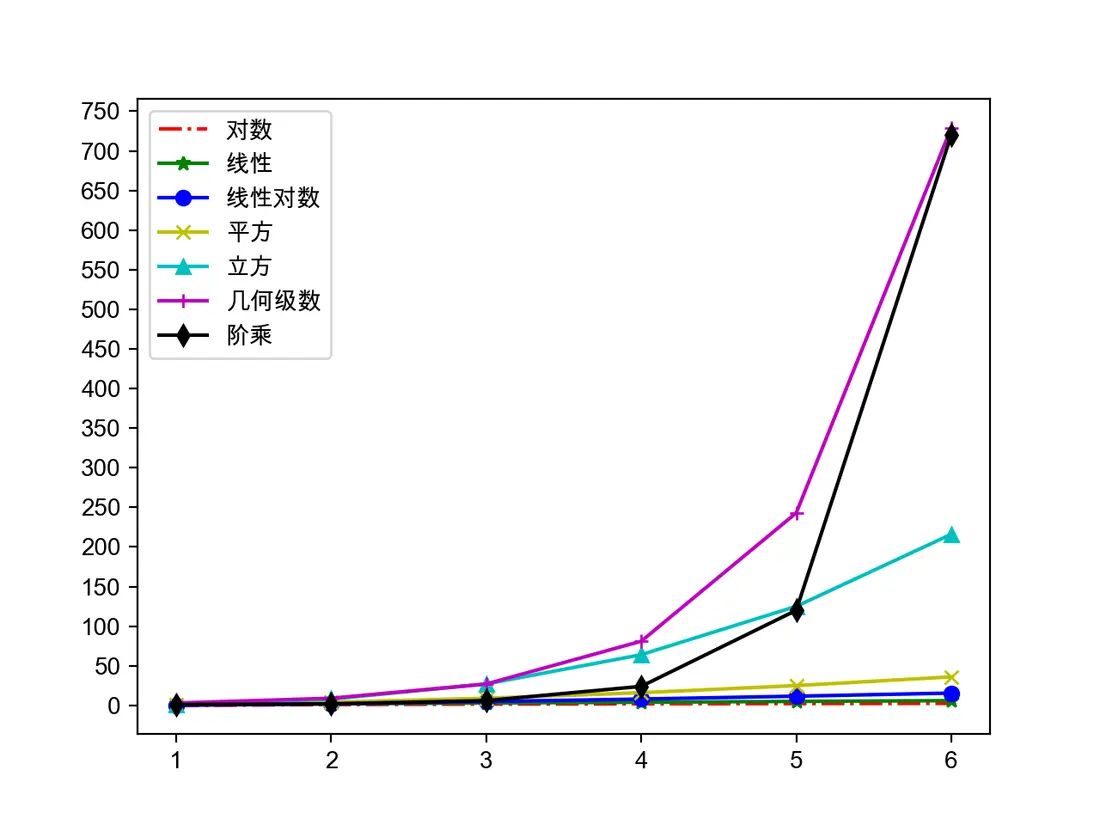
渐近时间复杂度的大O标记:
- 常量时间复杂度 - 布隆过滤器 / 哈希存储
- 对数时间复杂度 - 折半查找(二分查找)
- 线性时间复杂度 - 顺序查找 / 计数排序
- 对数线性时间复杂度 - 高级排序算法(归并排序、快速排序)
- 平方时间复杂度 - 简单排序算法(选择排序、插入排序、冒泡排序)
- 立方时间复杂度 - Floyd算法 / 矩阵乘法运算
- 几何级数时间复杂度 - 汉诺塔
- 阶乘时间复杂度 - 旅行经销商问题 - NPC
-
排序算法(选择、冒泡和归并)和查找算法(顺序和折半)
def select_sort(items, comp=lambda x, y: x < y):"""简单选择排序"""items = items[:]for i in range(len(items) - 1):min_index = ifor j in range(i + 1, len(items)):if comp(items[j], items[min_index]):min_index = jitems[i], items[min_index] = items[min_index], items[i]return itemsdef bubble_sort(items, comp=lambda x, y: x > y):"""冒泡排序"""items = items[:]for i in range(len(items) - 1):swapped = Falsefor j in range(len(items) - 1 - i):if comp(items[j], items[j + 1]):items[j], items[j + 1] = items[j + 1], items[j]swapped = Trueif not swapped:breakreturn itemsdef bubble_sort(items, comp=lambda x, y: x > y):"""搅拌排序(冒泡排序升级版)"""items = items[:]for i in range(len(items) - 1):swapped = Falsefor j in range(len(items) - 1 - i):if comp(items[j], items[j + 1]):items[j], items[j + 1] = items[j + 1], items[j]swapped = Trueif swapped:swapped = Falsefor j in range(len(items) - 2 - i, i, -1):if comp(items[j - 1], items[j]):items[j], items[j - 1] = items[j - 1], items[j]swapped = Trueif not swapped:breakreturn itemsdef merge(items1, items2, comp=lambda x, y: x < y):"""合并(将两个有序的列表合并成一个有序的列表)"""items = []index1, index2 = 0, 0while index1 < len(items1) and index2 < len(items2):if comp(items1[index1], items2[index2]):items.append(items1[index1])index1 += 1else:items.append(items2[index2])index2 += 1items += items1[index1:]items += items2[index2:]return itemsdef merge_sort(items, comp=lambda x, y: x < y):return _merge_sort(list(items), comp)def _merge_sort(items, comp):"""归并排序"""if len(items) < 2:return itemsmid = len(items) // 2left = _merge_sort(items[:mid], comp)right = _merge_sort(items[mid:], comp)return merge(left, right, comp)def seq_search(items, key):"""顺序查找"""for index, item in enumerate(items):if item == key:return indexreturn -1def bin_search(items, key):"""折半查找"""start, end = 0, len(items) - 1while start <= end:mid = (start + end) // 2if key > items[mid]:start = mid + 1elif key < items[mid]:end = mid - 1else:return midreturn -1 -
常用算法:
- 穷举法 - 又称为暴力破解法,对所有的可能性进行验证,直到找到正确答案。
- 贪婪法 - 在对问题求解时,总是做出在当前看来
- 最好的选择,不追求最优解,快速找到满意解。
- 分治法 - 把一个复杂的问题分成两个或更多的相同或相似的子问题,再把子问题分成更小的子问题,直到可以直接求解的程度,最后将子问题的解进行合并得到原问题的解。
- 回溯法 - 回溯法又称为试探法,按选优条件向前搜索,当搜索到某一步发现原先选择并不优或达不到目标时,就退回一步重新选择。
- 动态规划 - 基本思想也是将待求解问题分解成若干个子问题,先求解并保存这些子问题的解,避免产生大量的重复运算。
穷举法例子:百钱百鸡和五人分鱼。
# 公鸡5元一只 母鸡3元一只 小鸡1元三只# 用100元买100只鸡 问公鸡/母鸡/小鸡各多少只for x in range(20):for y in range(33):z = 100 - x - yif 5 * x + 3 * y + z // 3 == 100 and z % 3 == 0:print(x, y, z)# A、B、C、D、E五人在某天夜里合伙捕鱼 最后疲惫不堪各自睡觉# 第二天A第一个醒来 他将鱼分为5份 扔掉多余的1条 拿走自己的一份# B第二个醒来 也将鱼分为5份 扔掉多余的1条 拿走自己的一份# 然后C、D、E依次醒来也按同样的方式分鱼 问他们至少捕了多少条鱼fish = 6while True:total = fishenough = Truefor _ in range(5):if (total - 1) % 5 == 0:total = (total - 1) // 5 * 4else:enough = Falsebreakif enough:print(fish)breakfish += 5贪婪法例子:假设小偷有一个背包,最多能装20公斤赃物,他闯入一户人家,发现如下表所示的物品。很显然,他不能把所有物品都装进背包,所以必须确定拿走哪些物品,留下哪些物品。
名称 价格(美元) 重量(kg) 电脑 200 20 收音机 20 4 钟 175 10 花瓶 50 2 书 10 1 油画 90 9 """贪婪法:在对问题求解时,总是做出在当前看来是最好的选择,不追求最优解,快速找到满意解。输入:20 6电脑 200 20收音机 20 4钟 175 10花瓶 50 2书 10 1油画 90 9"""class Thing(object):"""物品"""def __init__(self, name, price, weight):self.name = nameself.price = priceself.weight = weight@propertydef value(self):"""价格重量比"""return self.price / self.weightdef input_thing():"""输入物品信息"""name_str, price_str, weight_str = input().split()return name_str, int(price_str), int(weight_str)def main():"""主函数"""max_weight, num_of_things = map(int, input().split())all_things = []for _ in range(num_of_things):all_things.append(Thing(*input_thing()))all_things.sort(key=lambda x: x.value, reverse=True)total_weight = 0total_price = 0for thing in all_things:if total_weight + thing.weight <= max_weight:print(f'小偷拿走了{thing.name}')total_weight += thing.weighttotal_price += thing.priceprint(f'总价值: {total_price}美元')if __name__ == '__main__':main()分治法例子:快速排序。
"""快速排序 - 选择枢轴对元素进行划分,左边都比枢轴小右边都比枢轴大"""def quick_sort(items, comp=lambda x, y: x <= y):items = list(items)[:]_quick_sort(items, 0, len(items) - 1, comp)return itemsdef _quick_sort(items, start, end, comp):if start < end:pos = _partition(items, start, end, comp)_quick_sort(items, start, pos - 1, comp)_quick_sort(items, pos + 1, end, comp)def _partition(items, start, end, comp):pivot = items[end]i = start - 1for j in range(start, end):if comp(items[j], pivot):i += 1items[i], items[j] = items[j], items[i]items[i + 1], items[end] = items[end], items[i + 1]return i + 1回溯法例子:骑士巡逻。
"""递归回溯法:叫称为试探法,按选优条件向前搜索,当搜索到某一步,发现原先选择并不优或达不到目标时,就退回一步重新选择,比较经典的问题包括骑士巡逻、八皇后和迷宫寻路等。"""import sysimport timeSIZE = 5total = 0def print_board(board):for row in board:for col in row:print(str(col).center(4), end='')print()def patrol(board, row, col, step=1):if row >= 0 and row < SIZE and \col >= 0 and col < SIZE and \board[row][col] == 0:board[row][col] = stepif step == SIZE * SIZE:global totaltotal += 1print(f'第{total}种走法: ')print_board(board)patrol(board, row - 2, col - 1, step + 1)patrol(board, row - 1, col - 2, step + 1)patrol(board, row + 1, col - 2, step + 1)patrol(board, row + 2, col - 1, step + 1)patrol(board, row + 2, col + 1, step + 1)patrol(board, row + 1, col + 2, step + 1)patrol(board, row - 1, col + 2, step + 1)patrol(board, row - 2, col + 1, step + 1)board[row][col] = 0def main():board = [[0] * SIZE for _ in range(SIZE)]patrol(board, SIZE - 1, SIZE - 1)if __name__ == '__main__':main()动态规划例子:子列表元素之和的最大值。
说明:子列表指的是列表中索引(下标)连续的元素构成的列表;列表中的元素是int类型,可能包含正整数、0、负整数;程序输入列表中的元素,输出子列表元素求和的最大值,例如:
输入:1 -2 3 5 -3 2
输出:8
输入:0 -2 3 5 -1 2
输出:9
输入:-9 -2 -3 -5 -3
输出:-2
def main():items = list(map(int, input().split()))overall = partial = items[0]for i in range(1, len(items)):partial = max(items[i], partial + items[i])overall = max(partial, overall)print(overall)if __name__ == '__main__':main()说明:这个题目最容易想到的解法是使用二重循环,但是代码的时间性能将会变得非常的糟糕。使用动态规划的思想,仅仅是多用了两个变量,就将原来复杂度的问题变成了。
函数的使用方式
-
将函数视为“一等公民”
- 函数可以赋值给变量
- 函数可以作为函数的参数
- 函数可以作为函数的返回值
-
高阶函数的用法(
filter、map以及它们的替代品)items1 = list(map(lambda x: x ** 2, filter(lambda x: x % 2, range(1, 10))))items2 = [x ** 2 for x in range(1, 10) if x % 2] -
位置参数、可变参数、关键字参数、命名关键字参数
-
参数的元信息(代码可读性问题)
-
匿名函数和内联函数的用法(
lambda函数) -
闭包和作用域问题
-
Python搜索变量的LEGB顺序(Local >>> Embedded >>> Global >>> Built-in)
-
global和nonlocal关键字的作用global:声明或定义全局变量(要么直接使用现有的全局作用域的变量,要么定义一个变量放到全局作用域)。nonlocal:声明使用嵌套作用域的变量(嵌套作用域必须存在该变量,否则报错)。
-
-
装饰器函数(使用装饰器和取消装饰器)
例子:输出函数执行时间的装饰器。
def record_time(func):"""自定义装饰函数的装饰器"""@wraps(func)def wrapper(*args, **kwargs):start = time()result = func(*args, **kwargs)print(f'{func.__name__}: {time() - start}秒')return resultreturn wrapper如果装饰器不希望跟
print函数耦合,可以编写可以参数化的装饰器。from functools import wrapsfrom time import timedef record(output):"""可以参数化的装饰器"""def decorate(func):@wraps(func)def wrapper(*args, **kwargs):start = time()result = func(*args, **kwargs)output(func.__name__, time() - start)return resultreturn wrapperreturn decoratefrom functools import wrapsfrom time import timeclass Record():"""通过定义类的方式定义装饰器"""def __init__(self, output):self.output = outputdef __call__(self, func):@wraps(func)def wrapper(*args, **kwargs):start = time()result = func(*args, **kwargs)self.output(func.__name__, time() - start)return resultreturn wrapper说明:由于对带装饰功能的函数添加了@wraps装饰器,可以通过
func.__wrapped__方式获得被装饰之前的函数或类来取消装饰器的作用。例子:用装饰器来实现单例模式。
from functools import wrapsdef singleton(cls):"""装饰类的装饰器"""instances = {}@wraps(cls)def wrapper(*args, **kwargs):if cls not in instances:instances[cls] = cls(*args, **kwargs)return instances[cls]return wrapper@singletonclass President:"""总统(单例类)"""pass提示:上面的代码中用到了闭包(closure),不知道你是否已经意识到了。还没有一个小问题就是,上面的代码并没有实现线程安全的单例,如果要实现线程安全的单例应该怎么做呢?
线程安全的单例装饰器。
from functools import wrapsfrom threading import RLockdef singleton(cls):"""线程安全的单例装饰器"""instances = {}locker = RLock()@wraps(cls)def wrapper(*args, **kwargs):if cls not in instances:with locker:if cls not in instances:instances[cls] = cls(*args, **kwargs)return instances[cls]return wrapper提示:上面的代码用到了
with上下文语法来进行锁操作,因为锁对象本身就是上下文管理器对象(支持__enter__和__exit__魔术方法)。在wrapper函数中,我们先做了一次不带锁的检查,然后再做带锁的检查,这样做比直接加锁检查性能要更好,如果对象已经创建就没有必须再去加锁而是直接返回该对象就可以了。
面向对象相关知识
-
三大支柱:封装、继承、多态
例子:工资结算系统。
"""月薪结算系统 - 部门经理每月15000 程序员每小时200 销售员1800底薪加销售额5%提成"""from abc import ABCMeta, abstractmethodclass Employee(metaclass=ABCMeta):"""员工(抽象类)"""def __init__(self, name):self.name = name@abstractmethoddef get_salary(self):"""结算月薪(抽象方法)"""passclass Manager(Employee):"""部门经理"""def get_salary(self):return 15000.0class Programmer(Employee):"""程序员"""def __init__(self, name, working_hour=0):self.working_hour = working_hoursuper().__init__(name)def get_salary(self):return 200.0 * self.working_hourclass Salesman(Employee):"""销售员"""def __init__(self, name, sales=0.0):self.sales = salessuper().__init__(name)def get_salary(self):return 1800.0 + self.sales * 0.05class EmployeeFactory:"""创建员工的工厂(工厂模式 - 通过工厂实现对象使用者和对象之间的解耦合)"""@staticmethoddef create(emp_type, *args, **kwargs):"""创建员工"""all_emp_types = {'M': Manager, 'P': Programmer, 'S': Salesman}cls = all_emp_types[emp_type.upper()]return cls(*args, **kwargs) if cls else Nonedef main():"""主函数"""emps = [EmployeeFactory.create('M', '曹操'),EmployeeFactory.create('P', '荀彧', 120),EmployeeFactory.create('P', '郭嘉', 85),EmployeeFactory.create('S', '典韦', 123000),]for emp in emps:print(f'{emp.name}: {emp.get_salary():.2f}元')if __name__ == '__main__':main() -
类与类之间的关系
- is-a关系:继承
- has-a关系:关联 / 聚合 / 合成
- use-a关系:依赖
例子:扑克游戏。
"""经验:符号常量总是优于字面常量,枚举类型是定义符号常量的最佳选择"""from enum import Enum, uniqueimport random@uniqueclass Suite(Enum):"""花色"""SPADE, HEART, CLUB, DIAMOND = range(4)def __lt__(self, other):return self.value < other.valueclass Card:"""牌"""def __init__(self, suite, face):"""初始化方法"""self.suite = suiteself.face = facedef show(self):"""显示牌面"""suites = ['♠︎', '♥︎', '♣︎', '♦︎']faces = ['', 'A', '2', '3', '4', '5', '6', '7', '8', '9', '10', 'J', 'Q', 'K']return f'{suites[self.suite.value]}{faces[self.face]}'def __repr__(self):return self.show()class Poker:"""扑克"""def __init__(self):self.index = 0self.cards = [Card(suite, face)for suite in Suitefor face in range(1, 14)]def shuffle(self):"""洗牌(随机乱序)"""random.shuffle(self.cards)self.index = 0def deal(self):"""发牌"""card = self.cards[self.index]self.index += 1return card@propertydef has_more(self):return self.index < len(self.cards)class Player:"""玩家"""def __init__(self, name):self.name = nameself.cards = []def get_one(self, card):"""摸一张牌"""self.cards.append(card)def sort(self, comp=lambda card: (card.suite, card.face)):"""整理手上的牌"""self.cards.sort(key=comp)def main():"""主函数"""poker = Poker()poker.shuffle()players = [Player('东邪'), Player('西毒'), Player('南帝'), Player('北丐')]while poker.has_more:for player in players:player.get_one(poker.deal())for player in players:player.sort()print(player.name, end=': ')print(player.cards)if __name__ == '__main__':main()说明:上面的代码中使用了Emoji字符来表示扑克牌的四种花色,在某些不支持Emoji字符的系统上可能无法显示。
-
对象的复制(深复制/深拷贝/深度克隆和浅复制/浅拷贝/影子克隆)
-
垃圾回收、循环引用和弱引用
Python使用了自动化内存管理,这种管理机制以引用计数为基础,同时也引入了标记-清除和分代收集两种机制为辅的策略。
typedef struct _object {/* 引用计数 */int ob_refcnt;/* 对象指针 */struct _typeobject *ob_type;} PyObject;/* 增加引用计数的宏定义 */#define Py_INCREF(op) ((op)->ob_refcnt++)/* 减少引用计数的宏定义 */#define Py_DECREF(op) \ //减少计数if (--(op)->ob_refcnt != 0) \; \else \__Py_Dealloc((PyObject *)(op))导致引用计数+1的情况:
- 对象被创建,例如
a = 23 - 对象被引用,例如
b = a - 对象被作为参数,传入到一个函数中,例如
f(a) - 对象作为一个元素,存储在容器中,例如
list1 = [a, a]
导致引用计数-1的情况:
- 对象的别名被显式销毁,例如
del a - 对象的别名被赋予新的对象,例如
a = 24 - 一个对象离开它的作用域,例如f函数执行完毕时,f函数中的局部变量(全局变量不会)
- 对象所在的容器被销毁,或从容器中删除对象
引用计数可能会导致循环引用问题,而循环引用会导致内存泄露,如下面的代码所示。为了解决这个问题,Python中引入了“标记-清除”和“分代收集”。在创建一个对象的时候,对象被放在第一代中,如果在第一代的垃圾检查中对象存活了下来,该对象就会被放到第二代中,同理在第二代的垃圾检查中对象存活下来,该对象就会被放到第三代中。
# 循环引用会导致内存泄露 - Python除了引用技术还引入了标记清理和分代回收# 在Python 3.6以前如果重写__del__魔术方法会导致循环引用处理失效# 如果不想造成循环引用可以使用弱引用list1 = []list2 = []list1.append(list2)list2.append(list1)以下情况会导致垃圾回收:
- 调用
gc.collect() gc模块的计数器达到阀值- 程序退出
如果循环引用中两个对象都定义了
__del__方法,gc模块不会销毁这些不可达对象,因为gc模块不知道应该先调用哪个对象的__del__方法,这个问题在Python 3.6中得到了解决。也可以通过
weakref模块构造弱引用的方式来解决循环引用的问题。 - 对象被创建,例如
-
魔法属性和方法(请参考《Python魔法方法指南》)
有几个小问题请大家思考:
- 自定义的对象能不能使用运算符做运算?
- 自定义的对象能不能放到
set中?能去重吗? - 自定义的对象能不能作为
dict的键? - 自定义的对象能不能使用上下文语法?
-
混入(Mixin)
例子:自定义字典限制只有在指定的key不存在时才能在字典中设置键值对。
class SetOnceMappingMixin:"""自定义混入类"""__slots__ = ()def __setitem__(self, key, value):if key in self:raise KeyError(str(key) + ' already set')return super().__setitem__(key, value)class SetOnceDict(SetOnceMappingMixin, dict):"""自定义字典"""passmy_dict= SetOnceDict()try:my_dict['username'] = 'jackfrued'my_dict['username'] = 'hellokitty'except KeyError:passprint(my_dict) -
元编程和元类
对象是通过类创建的,类是通过元类创建的,元类提供了创建类的元信息。所有的类都直接或间接的继承自
object,所有的元类都直接或间接的继承自type。例子:用元类实现单例模式。
import threadingclass SingletonMeta(type):"""自定义元类"""def __init__(cls, *args, **kwargs):cls.__instance = Nonecls.__lock = threading.RLock()super().__init__(*args, **kwargs)def __call__(cls, *args, **kwargs):if cls.__instance is None:with cls.__lock:if cls.__instance is None:cls.__instance = super().__call__(*args, **kwargs)return cls.__instanceclass President(metaclass=SingletonMeta):"""总统(单例类)"""pass -
面向对象设计原则
- 单一职责原则 (SRP)- 一个类只做该做的事情(类的设计要高内聚)
- 开闭原则 (OCP)- 软件实体应该对扩展开发对修改关闭
- 依赖倒转原则(DIP)- 面向抽象编程(在弱类型语言中已经被弱化)
- 里氏替换原则(LSP) - 任何时候可以用子类对象替换掉父类对象
- 接口隔离原则(ISP)- 接口要小而专不要大而全(Python中没有接口的概念)
- 合成聚合复用原则(CARP) - 优先使用强关联关系而不是继承关系复用代码
- 最少知识原则(迪米特法则,LoD)- 不要给没有必然联系的对象发消息
说明:上面加粗的字母放在一起称为面向对象的SOLID原则。
-
GoF设计模式
- 创建型模式:单例、工厂、建造者、原型
- 结构型模式:适配器、门面(外观)、代理
- 行为型模式:迭代器、观察者、状态、策略
例子:可插拔的哈希算法(策略模式)。
class StreamHasher:"""哈希摘要生成器"""def __init__(self, alg='md5', size=4096):self.size = sizealg = alg.lower()self.hasher = getattr(__import__('hashlib'), alg.lower())()def __call__(self, stream):return self.to_digest(stream)def to_digest(self, stream):"""生成十六进制形式的摘要"""for buf in iter(lambda: stream.read(self.size), b''):self.hasher.update(buf)return self.hasher.hexdigest()def main():"""主函数"""hasher1 = StreamHasher()with open('Python-3.7.6.tgz', 'rb') as stream:print(hasher1.to_digest(stream))hasher2 = StreamHasher('sha1')with open('Python-3.7.6.tgz', 'rb') as stream:print(hasher2(stream))if __name__ == '__main__':main()
迭代器和生成器
-
迭代器是实现了迭代器协议的对象。
- Python中没有像
protocol或interface这样的定义协议的关键字。 - Python中用魔术方法表示协议。
__iter__和__next__魔术方法就是迭代器协议。
class Fib(object):"""迭代器"""def __init__(self, num):self.num = numself.a, self.b = 0, 1self.idx = 0def __iter__(self):return selfdef __next__(self):if self.idx < self.num:self.a, self.b = self.b, self.a + self.bself.idx += 1return self.araise StopIteration() - Python中没有像
-
生成器是语法简化版的迭代器。
def fib(num):"""生成器"""a, b = 0, 1for _ in range(num):a, b = b, a + byield a -
生成器进化为协程。
生成器对象可以使用
send()方法发送数据,发送的数据会成为生成器函数中通过yield表达式获得的值。这样,生成器就可以作为协程使用,协程简单的说就是可以相互协作的子程序。def calc_avg():"""流式计算平均值"""total, counter = 0, 0avg_value = Nonewhile True:value = yield avg_valuetotal, counter = total + value, counter + 1avg_value = total / countergen = calc_avg()next(gen)print(gen.send(10))print(gen.send(20))print(gen.send(30))
并发编程
Python中实现并发编程的三种方案:多线程、多进程和异步I/O。并发编程的好处在于可以提升程序的执行效率以及改善用户体验;坏处在于并发的程序不容易开发和调试,同时对其他程序来说它并不友好。
-
多线程:Python中提供了
Thread类并辅以Lock、Condition、Event、Semaphore和Barrier。Python中有GIL来防止多个线程同时执行本地字节码,这个锁对于CPython是必须的,因为CPython的内存管理并不是线程安全的,因为GIL的存在多线程并不能发挥CPU的多核特性。"""面试题:进程和线程的区别和联系?进程 - 操作系统分配内存的基本单位 - 一个进程可以包含一个或多个线程线程 - 操作系统分配CPU的基本单位并发编程(concurrent programming)1. 提升执行性能 - 让程序中没有因果关系的部分可以并发的执行2. 改善用户体验 - 让耗时间的操作不会造成程序的假死"""import globimport osimport threadingfrom PIL import ImagePREFIX = 'thumbnails'def generate_thumbnail(infile, size, format='PNG'):"""生成指定图片文件的缩略图"""file, ext = os.path.splitext(infile)file = file[file.rfind('/') + 1:]outfile = f'{PREFIX}/{file}_{size[0]}_{size[1]}.{ext}'img = Image.open(infile)img.thumbnail(size, Image.ANTIALIAS)img.save(outfile, format)def main():"""主函数"""if not os.path.exists(PREFIX):os.mkdir(PREFIX)for infile in glob.glob('images/*.png'):for size in (32, 64, 128):# 创建并启动线程threading.Thread(target=generate_thumbnail,args=(infile, (size, size))).start()if __name__ == '__main__':main()多个线程竞争资源的情况。
"""多线程程序如果没有竞争资源处理起来通常也比较简单当多个线程竞争临界资源的时候如果缺乏必要的保护措施就会导致数据错乱说明:临界资源就是被多个线程竞争的资源"""import timeimport threadingfrom concurrent.futures import ThreadPoolExecutorclass Account(object):"""银行账户"""def __init__(self):self.balance = 0.0self.lock = threading.Lock()def deposit(self, money):# 通过锁保护临界资源with self.lock:new_balance = self.balance + moneytime.sleep(0.001)self.balance = new_balancedef main():"""主函数"""account = Account()# 创建线程池pool = ThreadPoolExecutor(max_workers=10)futures = []for _ in range(100):future = pool.submit(account.deposit, 1)futures.append(future)# 关闭线程池pool.shutdown()for future in futures:future.result()print(account.balance)if __name__ == '__main__':main()修改上面的程序,启动5个线程向账户中存钱,5个线程从账户中取钱,取钱时如果余额不足就暂停线程进行等待。为了达到上述目标,需要对存钱和取钱的线程进行调度,在余额不足时取钱的线程暂停并释放锁,而存钱的线程将钱存入后要通知取钱的线程,使其从暂停状态被唤醒。可以使用
threading模块的Condition来实现线程调度,该对象也是基于锁来创建的,代码如下所示:"""多个线程竞争一个资源 - 保护临界资源 - 锁(Lock/RLock)多个线程竞争多个资源(线程数>资源数) - 信号量(Semaphore)多个线程的调度 - 暂停线程执行/唤醒等待中的线程 - Condition"""from concurrent.futures import ThreadPoolExecutorfrom random import randintfrom time import sleepimport threadingclass Account:"""银行账户"""def __init__(self, balance=0):self.balance = balancelock = threading.RLock()self.condition = threading.Condition(lock)def withdraw(self, money):"""取钱"""with self.condition:while money > self.balance:self.condition.wait()new_balance = self.balance - moneysleep(0.001)self.balance = new_balancedef deposit(self, money):"""存钱"""with self.condition:new_balance = self.balance + moneysleep(0.001)self.balance = new_balanceself.condition.notify_all()def add_money(account):while True:money = randint(5, 10)account.deposit(money)print(threading.current_thread().name,':', money, '====>', account.balance)sleep(0.5)def sub_money(account):while True:money = randint(10, 30)account.withdraw(money)print(threading.current_thread().name,':', money, '<====', account.balance)sleep(1)def main():account = Account()with ThreadPoolExecutor(max_workers=15) as pool:for _ in range(5):pool.submit(add_money, account)for _ in range(10):pool.submit(sub_money, account)if __name__ == '__main__':main() -
多进程:多进程可以有效的解决GIL的问题,实现多进程主要的类是
Process,其他辅助的类跟threading模块中的类似,进程间共享数据可以使用管道、套接字等,在multiprocessing模块中有一个Queue类,它基于管道和锁机制提供了多个进程共享的队列。下面是官方文档上关于多进程和进程池的一个示例。"""多进程和进程池的使用多线程因为GIL的存在不能够发挥CPU的多核特性对于计算密集型任务应该考虑使用多进程time python3 example22.pyreal 0m11.512suser 0m39.319ssys 0m0.169s使用多进程后实际执行时间为11.512秒,而用户时间39.319秒约为实际执行时间的4倍这就证明我们的程序通过多进程使用了CPU的多核特性,而且这台计算机配置了4核的CPU"""import concurrent.futuresimport mathPRIMES = [1116281,1297337,104395303,472882027,533000389,817504243,982451653,112272535095293,112582705942171,112272535095293,115280095190773,115797848077099,1099726899285419] * 5def is_prime(n):"""判断素数"""if n % 2 == 0:return Falsesqrt_n = int(math.floor(math.sqrt(n)))for i in range(3, sqrt_n + 1, 2):if n % i == 0:return Falsereturn Truedef main():"""主函数"""with concurrent.futures.ProcessPoolExecutor() as executor:for number, prime in zip(PRIMES, executor.map(is_prime, PRIMES)):print('%d is prime: %s' % (number, prime))if __name__ == '__main__':main()重点:多线程和多进程的比较。
以下情况需要使用多线程:
- 程序需要维护许多共享的状态(尤其是可变状态),Python中的列表、字典、集合都是线程安全的,所以使用线程而不是进程维护共享状态的代价相对较小。
- 程序会花费大量时间在I/O操作上,没有太多并行计算的需求且不需占用太多的内存。
以下情况需要使用多进程:
- 程序执行计算密集型任务(如:字节码操作、数据处理、科学计算)。
- 程序的输入可以并行的分成块,并且可以将运算结果合并。
- 程序在内存使用方面没有任何限制且不强依赖于I/O操作(如:读写文件、套接字等)。
-
异步处理:从调度程序的任务队列中挑选任务,该调度程序以交叉的形式执行这些任务,我们并不能保证任务将以某种顺序去执行,因为执行顺序取决于队列中的一项任务是否愿意将 CPU 处理时间让位给另一项任务。异步任务通常通过多任务协作处理的方式来实现,由于执行时间和顺序的不确定,因此需要通过回调式编程或者
future对象来获取任务执行的结果。Python 3 通过asyncio模块和await和async关键字(在 Python 3.7 中正式被列为关键字)来支持异步处理。"""异步I/O - async / await"""import asynciodef num_generator(m, n):"""指定范围的数字生成器"""yield from range(m, n + 1)async def prime_filter(m, n):"""素数过滤器"""primes = []for i in num_generator(m, n):flag = Truefor j in range(2, int(i ** 0.5 + 1)):if i % j == 0:flag = Falsebreakif flag:print('Prime =>', i)primes.append(i)await asyncio.sleep(0.001)return tuple(primes)async def square_mapper(m, n):"""平方映射器"""squares = []for i in num_generator(m, n):print('Square =>', i * i)squares.append(i * i)await asyncio.sleep(0.001)return squaresdef main():"""主函数"""loop = asyncio.get_event_loop()future = asyncio.gather(prime_filter(2, 100), square_mapper(1, 100))future.add_done_callback(lambda x: print(x.result()))loop.run_until_complete(future)loop.close()if __name__ == '__main__':main()说明:上面的代码使用
get_event_loop函数获得系统默认的事件循环,通过gather函数可以获得一个future对象,future对象的add_done_callback可以添加执行完成时的回调函数,loop对象的run_until_complete方法可以等待通过future对象获得协程执行结果。Python 中有一个名为
aiohttp的三方库,它提供了异步的 HTTP 客户端和服务器,这个三方库可以跟asyncio模块一起工作,并提供了对Future对象的支持。Python 3.6中引入了async和await来定义异步执行的函数以及创建异步上下文,在 Python 3.7 中它们正式成为了关键字。下面的代码异步的从5个URL中获取页面并通过正则表达式的命名捕获组提取了网站的标题。import asyncioimport reimport aiohttpPATTERN = re.compile(r'\<title\>(?P<title>.*)\<\/title\>')async def fetch_page(session, url):async with session.get(url, ssl=False) as resp:return await resp.text()async def show_title(url):async with aiohttp.ClientSession() as session:html = await fetch_page(session, url)print(PATTERN.search(html).group('title'))def main():urls = ('https://www.python.org/','https://git-scm.com/','https://www.jd.com/','https://www.taobao.com/','https://www.douban.com/')loop = asyncio.get_event_loop()cos = [show_title(url) for url in urls]loop.run_until_complete(asyncio.wait(cos))loop.close()if __name__ == '__main__':main()重点:异步I/O与多进程的比较。
当程序不需要真正的并发性或并行性,而是更多的依赖于异步处理和回调时,
asyncio就是一种很好的选择。如果程序中有大量的等待与休眠时,也应该考虑asyncio,它很适合编写没有实时数据处理需求的 Web 应用服务器。Python 还有很多用于处理并行任务的三方库,例如:
joblib、PyMP等。实际开发中,要提升系统的可扩展性和并发性通常有垂直扩展(增加单个节点的处理能力)和水平扩展(将单个节点变成多个节点)两种做法。可以通过消息队列来实现应用程序的解耦合,消息队列相当于是多线程同步队列的扩展版本,不同机器上的应用程序相当于就是线程,而共享的分布式消息队列就是原来程序中的Queue。消息队列(面向消息的中间件)的最流行和最标准化的实现是 AMQP(高级消息队列协议),AMQP 源于金融行业,提供了排队、路由、可靠传输、安全等功能,最著名的实现包括:Apache 的 ActiveMQ、RabbitMQ 等。要实现任务的异步化,可以使用名为
Celery的三方库。Celery是 Python 编写的分布式任务队列,它使用分布式消息进行工作,可以基于 RabbitMQ 或 Redis 来作为后端的消息代理。
32-33 Web前端概述
说明:本文使用的部分插图来自 Jon Duckett 的*HTML and CSS: Design and Build Websites*一书,这是一本非常棒的前端入门书,有兴趣的读者可以在亚马逊或者其他网站上找到该书的购买链接。
HTML 是用来描述网页的一种语言,全称是 Hyper-Text Markup Language,即超文本标记语言。我们浏览网页时看到的文字、按钮、图片、视频等元素,它们都是通过 HTML 书写并通过浏览器来呈现的。
HTML简史
- 1991年10月:一个非正式CERN(欧洲核子研究中心)文件首次公开18个HTML标签,这个文件的作者是物理学家蒂姆·伯纳斯-李,因此他是万维网的发明者,也是万维网联盟的主席。
- 1995年11月:HTML 2.0标准发布(RFC 1866)。
- 1997年1月:HTML 3.2作为W3C推荐标准发布。
- 1997年12月:HTML 4.0作为W3C推荐标准发布。
- 1999年12月:HTML4.01作为W3C推荐标准发布。
- 2008年1月:HTML5由W3C作为工作草案发布。
- 2011年5月:W3C将HTML5推进至“最终征求”(Last Call)阶段。
- 2012年12月:W3C指定HTML5作为“候选推荐”阶段。
- 2014年10月:HTML5作为稳定W3C推荐标准发布,这意味着HTML5的标准化已经完成。
HTML5新特性
- 引入原生多媒体支持(audio和video标签)
- 引入可编程内容(canvas标签)
- 引入语义Web(article、aside、details、figure、footer、header、nav、section、summary等标签)
- 引入新的表单控件(日历、邮箱、搜索、滑条等)
- 引入对离线存储更好的支持(localStorage和sessionStorage)
- 引入对定位、拖放、WebSocket、后台任务等的支持
使用标签承载内容

结构
- html
- head
- title
- meta
- body
- head
文本
- 标题(heading)和段落(paragraph)
- h1 ~ h6
- p
- 上标(superscript)和下标(subscript)
- sup
- sub
- 空白(白色空间折叠)
- 折行(break)和水平标尺(horizontal ruler)
- br
- hr
- 语义化标签
- 加粗和强调 - strong
- 引用 - blockquote
- 缩写词和首字母缩写词 - abbr / acronym
- 引文 - cite
- 所有者联系信息 - address
- 内容的修改 - ins / del
列表(list)
- 有序列表(ordered list)- ol / li
- 无序列表(unordered list)- ul / li
- 定义列表(definition list)- dl / dt / dd
链接(anchor)
- 页面链接
- 锚链接
- 功能链接
图像(image)
-
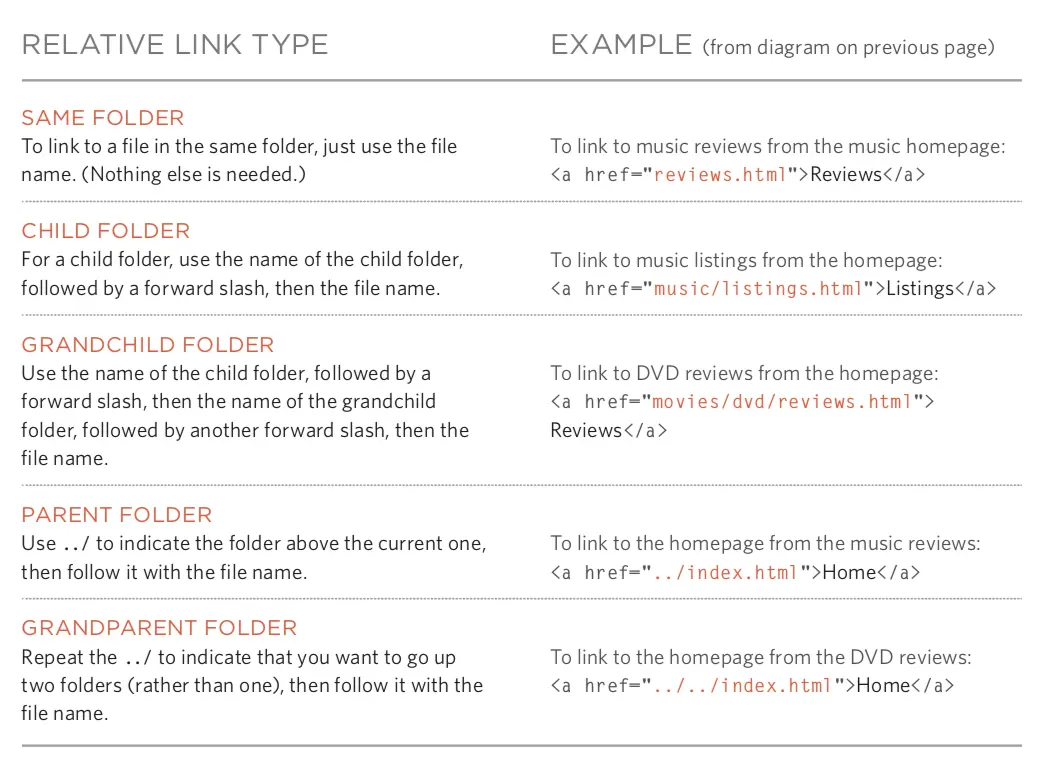
图像存储位置
-
图像及其宽高
-
选择正确的图像格式
- JPEG
- GIF
- PNG
-
矢量图
-
语义化标签 - figure / figcaption
表格(table)
- 基本的表格结构 - table / tr / td / th
- 表格的标题 - caption
- 跨行和跨列 - rowspan属性 / colspan属性
- 长表格 - thead / tbody / tfoot
表单(form)
- 重要属性 - action / method / enctype
- 表单控件(input)- type属性
- 文本框 -
text/ 密码框 -password/ 数字框 -number - 邮箱 -
email/ 电话 -tel/ 日期 -date/ 滑条 -range/ URL -url/ 搜索 -search - 单选按钮 -
radio/ 复选按钮 -checkbox - 文件上传 -
file/ 隐藏域 -hidden - 提交按钮 -
submit/ 图像按钮 -image/ 重置按钮 -reset
- 文本框 -
- 下拉列表 - select / option
- 文本域(多行文本)- textarea
- 组合表单元素 - fieldset / legend
音视频(audio / video)
- 视频格式和播放器
- 视频托管服务
- 添加视频的准备工作
- video标签和属性 - autoplay / controls / loop / muted / preload / src
- audio标签和属性 - autoplay / controls / loop / muted / preload / src / width / height / poster
窗口(frame)
-
框架集(过时,不建议使用) - frameset / frame
-
内嵌窗口 - iframe
其他
-
文档类型
<!doctype html><!DOCTYPE HTML PUBLIC "-//W3C//DTD HTML 4.01//EN" "http://www.w3.org/TR/html4/strict.dtd"><!DOCTYPE HTML PUBLIC "-//W3C//DTD HTML 4.01 Transitional//EN" "http://www.w3.org/TR/html4/loose.dtd"> -
注释
<!-- 这是一段注释,注释不能够嵌套 --> -
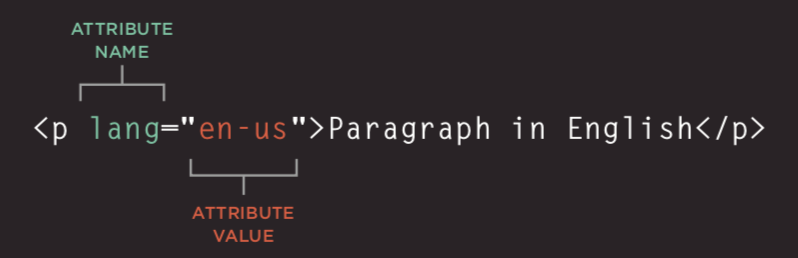
属性
- id:唯一标识
- class:元素所属的类,用于区分不同的元素
- title:元素的额外信息(鼠标悬浮时会显示工具提示文本)
- tabindex:Tab键切换顺序
- contenteditable:元素是否可编辑
- draggable:元素是否可拖拽
-
块级元素 / 行级元素
-
字符实体(实体替换符)

使用CSS渲染页面
简介
-
CSS的作用
-
CSS的工作原理
-
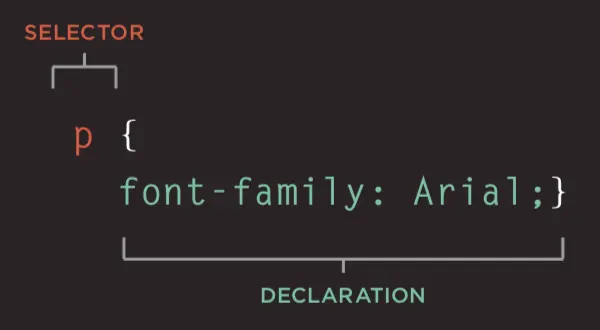
规则、属性和值
-
常用选择器

颜色(color)
- 如何指定颜色
- 颜色术语和颜色对比
- 背景色
文本(text / font)
-
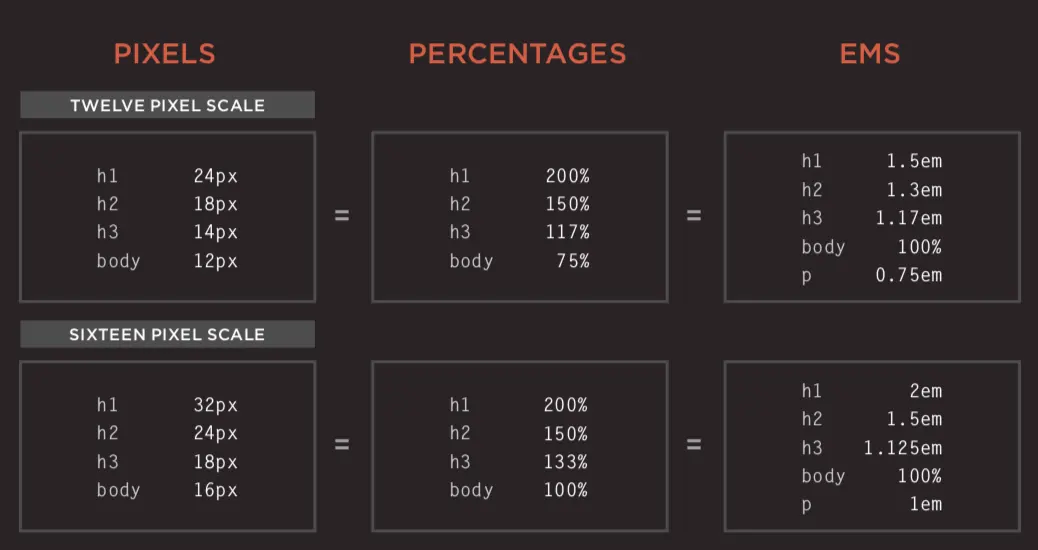
文本的大小和字型(font-size / font-family)

-
粗细、样式、拉伸和装饰(font-weight / font-style / font-stretch / text-decoration)

-
行间距(line-height)、字母间距(letter-spacing)和单词间距(word-spacing)
-
对齐(text-align)方式和缩进(text-ident)
-
链接样式( /
/ / ) -
CSS3新属性
- 阴影效果 - text-shadow
- 首字母和首行文本(
/ ) - 响应用户
盒子(box model)
-
盒子大小的控制(width / height)
-
盒子的边框、外边距和内边距(border / margin / padding)

-
盒子的显示和隐藏(display / visibility)
-
CSS3新属性
- 边框图像(border-image)
- 投影(border-shadow)
- 圆角(border-radius)
列表、表格和表单
- 列表的项目符号(list-style)
- 表格的边框和背景(border-collapse)
- 表单控件的外观
- 表单控件的对齐
- 浏览器的开发者工具
图像
- 控制图像的大小(display: inline-block)
- 对齐图像
- 背景图像(background / background-image / background-repeat / background-position)
布局
-
控制元素的位置(position / z-index)
- 普通流
- 相对定位
- 绝对定位
- 固定定位
- 浮动元素(float / clear)
-
网站布局
-
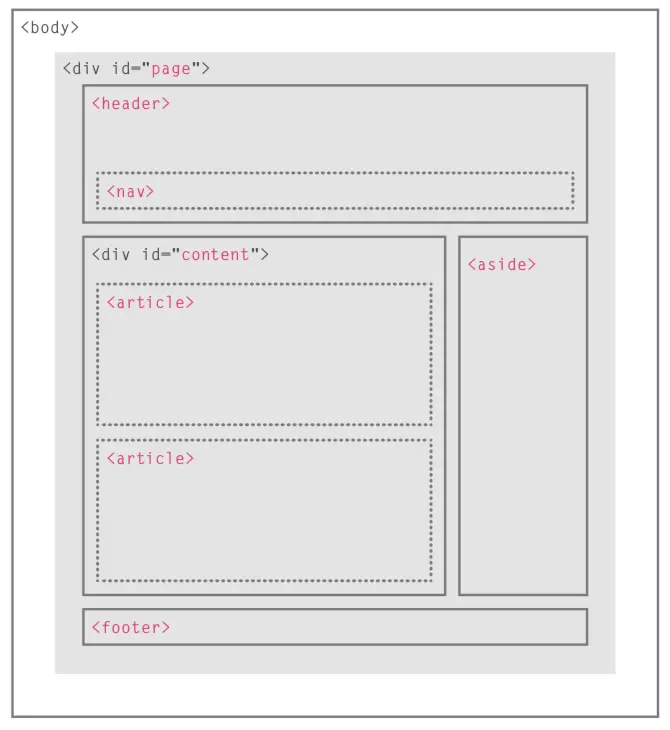
HTML5布局
-
-
适配屏幕尺寸
- 固定宽度布局
- 流体布局
- 布局网格
使用JavaScript控制行为
JavaScript基本语法
- 语句和注释
- 变量和数据类型
- 声明和赋值
- 简单数据类型和复杂数据类型
- 变量的命名规则
- 表达式和运算符
- 赋值运算符
- 算术运算符
- 比较运算符
- 逻辑运算符:
&&、||、!
- 分支结构
if...else...switch...cas...default...
- 循环结构
for循环while循环do...while循环
- 数组
- 创建数组
- 操作数组中的元素
- 函数
- 声明函数
- 调用函数
- 参数和返回值
- 匿名函数
- 立即调用函数
面向对象
- 对象的概念
- 创建对象的字面量语法
- 访问成员运算符
- 创建对象的构造函数语法
this关键字
- 添加和删除属性
delete关键字
- 标准对象
Number/String/Boolean/Symbol/Array/FunctionDate/Error/Math/RegExp/Object/Map/SetJSON/Promise/Generator/Reflect/Proxy
BOM
window对象的属性和方法history对象forward()/back()/go()
location对象navigator对象screen对象
DOM
- DOM树
- 访问元素
getElementById()/querySelector()getElementsByClassName()/getElementsByTagName()/querySelectorAll()parentNode/previousSibling/nextSibling/children/firstChild/lastChild
- 操作元素
nodeValueinnerHTML/textContent/createElement()/createTextNode()/appendChild()/insertBefore()/removeChild()className/id/hasAttribute()/getAttribute()/setAttribute()/removeAttribute()
- 事件处理
- 事件类型
- UI事件:
load/unload/error/resize/scroll - 键盘事件:
keydown/keyup/keypress - 鼠标事件:
click/dbclick/mousedown/mouseup/mousemove/mouseover/mouseout - 焦点事件:
focus/blur - 表单事件:
input/change/submit/reset/cut/copy/paste/select
- UI事件:
- 事件绑定
- HTML事件处理程序(不推荐使用,因为要做到标签与代码分离)
- 传统的DOM事件处理程序(只能附加一个回调函数)
- 事件监听器(旧的浏览器中不被支持)
- 事件流:事件捕获 / 事件冒泡
- 事件对象(低版本IE中的window.event)
target(有些浏览器使用srcElement)typecancelablepreventDefault()stopPropagation()(低版本IE中的cancelBubble)
- 鼠标事件 - 事件发生的位置
- 屏幕位置:
screenX和screenY - 页面位置:
pageX和pageY - 客户端位置:
clientX和clientY
- 屏幕位置:
- 键盘事件 - 哪个键被按下了
keyCode属性(有些浏览器使用which)String.fromCharCode(event.keyCode)
- HTML5事件
DOMContentLoadedhashchangebeforeunload
- 事件类型
JavaScript API
-
客户端存储 -
localStorage和sessionStoragelocalStorage.colorSetting = '#a4509b';localStorage['colorSetting'] = '#a4509b';localStorage.setItem('colorSetting', '#a4509b'); -
获取位置信息 -
geolocationnavigator.geolocation.getCurrentPosition(function(pos) {console.log(pos.coords.latitude)console.log(pos.coords.longitude)}) -
从服务器获取数据 - Fetch API
-
绘制图形 -
<canvas>的API -
音视频 -
<audio>和<video>的API
前端框架
渐进式框架 - Vue.js
前后端分离开发(前端渲染)必选框架。
快速上手
-
引入Vue的JavaScript文件,我们仍然推荐从CDN服务器加载它。
<script src="https://cdn.jsdelivr.net/npm/vue"></script> -
数据绑定(声明式渲染 )。
<div id="app"><h1>{{ product }}库存信息</h1></div><script src="https://cdn.jsdelivr.net/npm/vue"></script><script>const app = new Vue({el: '#app',data: {product: 'iPhone X'}});</script> -
条件与循环。
<div id="app"><h1>库存信息</h1><hr><ul><li v-for="product in products">{{ product.name }} - {{ product.quantity }}<span v-if="product.quantity === 0">已经售罄</span></li></ul></div><script src="https://cdn.jsdelivr.net/npm/vue"></script><script>const app = new Vue({el: '#app',data: {products: [{"id": 1, "name": "iPhone X", "quantity": 20},{"id": 2, "name": "华为 Mate20", "quantity": 0},{"id": 3, "name": "小米 Mix3", "quantity": 50}]}});</script> -
计算属性。
<div id="app"><h1>库存信息</h1><hr><ul><li v-for="product in products">{{ product.name }} - {{ product.quantity }}<span v-if="product.quantity === 0">已经售罄</span></li></ul><h2>库存总量:{{ totalQuantity }}台</h2></div><script src="https://cdn.jsdelivr.net/npm/vue"></script><script>const app = new Vue({el: '#app',data: {products: [{"id": 1, "name": "iPhone X", "quantity": 20},{"id": 2, "name": "华为 Mate20", "quantity": 0},{"id": 3, "name": "小米 Mix3", "quantity": 50}]},computed: {totalQuantity() {return this.products.reduce((sum, product) => {return sum + product.quantity}, 0);}}});</script> -
处理事件。
<div id="app"><h1>库存信息</h1><hr><ul><li v-for="product in products">{{ product.name }} - {{ product.quantity }}<span v-if="product.quantity === 0">已经售罄</span><button @click="product.quantity += 1">增加库存</button></li></ul><h2>库存总量:{{ totalQuantity }}台</h2></div><script src="https://cdn.jsdelivr.net/npm/vue"></script><script>const app = new Vue({el: '#app',data: {products: [{"id": 1, "name": "iPhone X", "quantity": 20},{"id": 2, "name": "华为 Mate20", "quantity": 0},{"id": 3, "name": "小米 Mix3", "quantity": 50}]},computed: {totalQuantity() {return this.products.reduce((sum, product) => {return sum + product.quantity}, 0);}}});</script> -
用户输入。
<div id="app"><h1>库存信息</h1><hr><ul><li v-for="product in products">{{ product.name }} -<input type="number" v-model.number="product.quantity" min="0"><span v-if="product.quantity === 0">已经售罄</span><button @click="product.quantity += 1">增加库存</button></li></ul><h2>库存总量:{{ totalQuantity }}台</h2></div><script src="https://cdn.jsdelivr.net/npm/vue"></script><script>const app = new Vue({el: '#app',data: {products: [{"id": 1, "name": "iPhone X", "quantity": 20},{"id": 2, "name": "华为 Mate20", "quantity": 0},{"id": 3, "name": "小米 Mix3", "quantity": 50}]},computed: {totalQuantity() {return this.products.reduce((sum, product) => {return sum + product.quantity}, 0);}}});</script> -
通过网络加载JSON数据。
<div id="app"><h2>库存信息</h2><ul><li v-for="product in products">{{ product.name }} - {{ product.quantity }}<span v-if="product.quantity === 0">已经售罄</span></li></ul></div><script src="https://cdn.jsdelivr.net/npm/vue"></script><script>const app = new Vue({el: '#app',data: {products: []},created() {fetch('https://jackfrued.top/api/products').then(response => response.json()).then(json => {this.products = json});}});</script>
使用脚手架 - vue-cli
Vue为商业项目开发提供了非常便捷的脚手架工具vue-cli,通过工具可以省去手工配置开发环境、测试环境和运行环境的步骤,让开发者只需要关注要解决的问题。
- 安装脚手架。
- 创建项目。
- 安装依赖包。
- 运行项目。
UI框架 - Element
基于Vue 2.0的桌面端组件库,用于构造用户界面,支持响应式布局。
-
引入Element的CSS和JavaScript文件。
<!-- 引入样式 --><link rel="stylesheet" href="https://unpkg.com/element-ui/lib/theme-chalk/index.css"><!-- 引入组件库 --><script src="https://unpkg.com/element-ui/lib/index.js"></script> -
一个简单的例子。
<!DOCTYPE html><html><head><meta charset="UTF-8"><link rel="stylesheet" href="https://unpkg.com/element-ui/lib/theme-chalk/index.css"></head><body><div id="app"><el-button @click="visible = true">点我</el-button><el-dialog :visible.sync="visible" title="Hello world"><p>开始使用Element吧</p></el-dialog></div></body><script src="https://unpkg.com/vue/dist/vue.js"></script><script src="https://unpkg.com/element-ui/lib/index.js"></script><script>new Vue({el: '#app',data: {visible: false,}})</script></html> -
使用组件。
<!DOCTYPE html><html><head><meta charset="UTF-8"><link rel="stylesheet" href="https://unpkg.com/element-ui/lib/theme-chalk/index.css"></head><body><div id="app"><el-table :data="tableData" stripe style="width: 100%"><el-table-column prop="date" label="日期" width="180"></el-table-column><el-table-column prop="name" label="姓名" width="180"></el-table-column><el-table-column prop="address" label="地址"></el-table-column></el-table></div></body><script src="https://unpkg.com/vue/dist/vue.js"></script><script src="https://unpkg.com/element-ui/lib/index.js"></script><script>new Vue({el: '#app',data: {tableData: [{date: '2016-05-02',name: '王一霸',address: '上海市普陀区金沙江路 1518 弄'},{date: '2016-05-04',name: '刘二狗',address: '上海市普陀区金沙江路 1517 弄'},{date: '2016-05-01',name: '杨三萌',address: '上海市普陀区金沙江路 1519 弄'},{date: '2016-05-03',name: '陈四吹',address: '上海市普陀区金沙江路 1516 弄'}]}})</script></html>
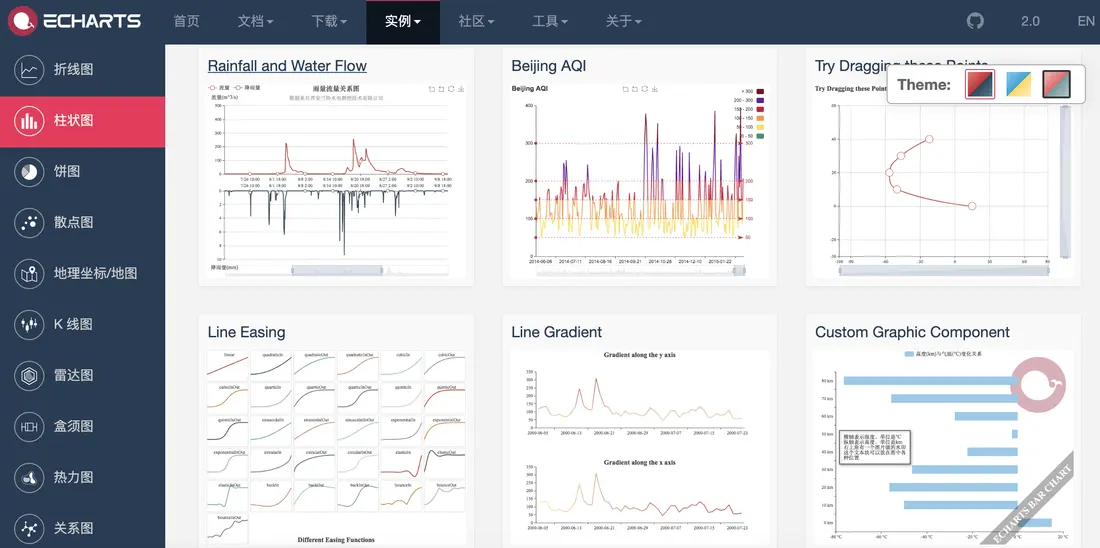
报表框架 - ECharts
百度出品的开源可视化库,常用于生成各种类型的报表。
基于弹性盒子的CSS框架 - Bulma
Bulma是一个基于Flexbox的现代化的CSS框架,其初衷就是移动优先(Mobile First),模块化设计,可以轻松用来实现各种简单或者复杂的内容布局,即使不懂CSS的开发者也能够使用它定制出漂亮的页面。
<!DOCTYPE html><html lang="en"><head> <meta charset="UTF-8"> <title>Bulma</title> <link href="https://cdn.bootcss.com/bulma/0.7.4/css/bulma.min.css" rel="stylesheet"> <style type="text/css"> div { margin-top: 10px; } .column { color: #fff; background-color: #063; margin: 10px 10px; text-align: center; } </style></head><body> <div class="columns"> <div class="column">1</div> <div class="column">2</div> <div class="column">3</div> <div class="column">4</div> </div> <div> <a class="button is-primary">Primary</a> <a class="button is-link">Link</a> <a class="button is-info">Info</a> <a class="button is-success">Success</a> <a class="button is-warning">Warning</a> <a class="button is-danger">Danger</a> </div> <div> <progress class="progress is-danger is-medium" max="100">60%</progress> </div> <div> <table class="table is-hoverable"> <tr> <th>One</th> <th>Two</th> </tr> <tr> <td>Three</td> <td>Four</td> </tr> <tr> <td>Five</td> <td>Six</td> </tr> <tr> <td>Seven</td> <td>Eight</td> </tr> <tr> <td>Nine</td> <td>Ten</td> </tr> <tr> <td>Eleven</td> <td>Twelve</td> </tr> </table> </div></body></html>响应式布局框架 - Bootstrap
用于快速开发Web应用程序的前端框架,支持响应式布局。
-
特点
- 支持主流的浏览器和移动设备
- 容易上手
- 响应式设计
-
内容
- 网格系统
- 封装的CSS
- 现成的组件
- JavaScript插件
-
可视化
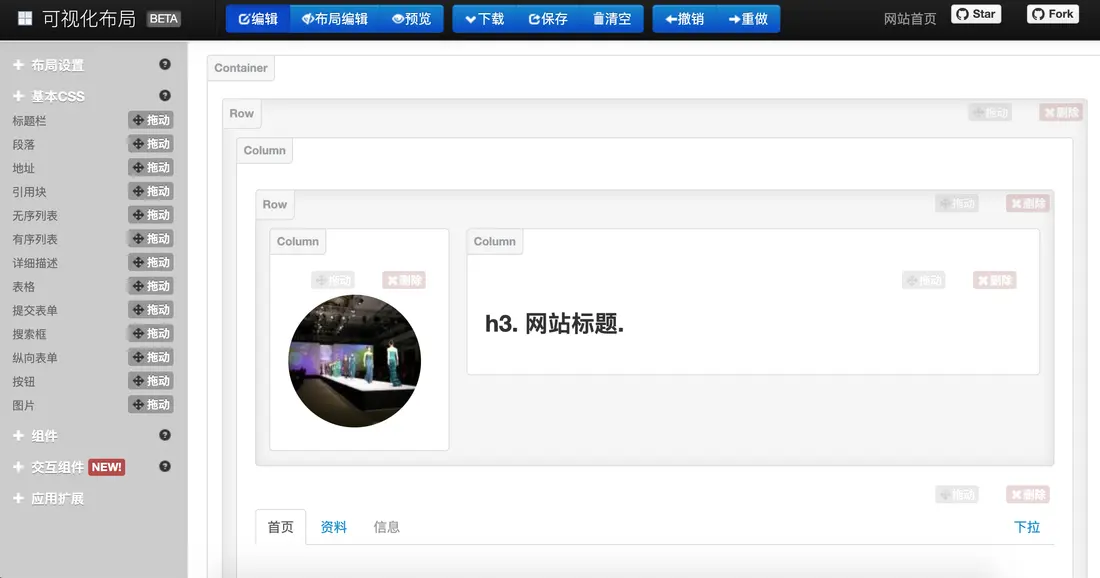
34-35 玩转Linux操作系统
玩转Linux操作系统
说明:本文中对Linux命令的讲解都是基于名为CentOS的Linux发行版本,我自己使用的是阿里云服务器,系统版本为CentOS Linux release 7.6.1810。不同的Linux发行版本在Shell命令和工具程序上会有一些差别,但是这些差别是很小的。
操作系统发展史
只有硬件没有软件的计算机系统被称之为“裸机”,我们很难用“裸机”来完成计算机日常的工作(如存储和运算),所以必须用特定的软件来控制硬件的工作。最靠近计算机硬件的软件是系统软件,其中最为重要的就是“操作系统”。“操作系统”是控制和管理整个计算机硬件和软件资源、实现资源分配和任务调配、为系统用户以及其他软件提供接口和环境的程序的集合。
没有操作系统(手工操作)
在计算机诞生之初没有操作系统的年代,人们先把程序纸带(或卡片)装上计算机,然后启动输入机把程序送入计算机,接着通过控制台开关启动程序运行。当程序执行完毕,打印机输出计算的结果,用户卸下并取走纸带(或卡片)。第二个用户上机,重复同样的步骤。在整个过程中用户独占机器,CPU等待手工操作,资源利用率极低。
批处理系统
首先启动计算机上的一个监督程序,在监督程序的控制下,计算机能够自动的、成批的处理一个或多个用户的作业。完成一批作业后,监督程度又从输入机读取作业存入磁带机。按照上面的步骤重复处理任务。监督程序不停的处理各个作业,实现了作业的自动转接,减少了作业的建立时间和手工操作时间,提高了计算机资源的利用率。 批处理系统又可以分为单道批处理系统、多道批处理系统、联机批处理系统、脱机批处理系统。
分时系统和实时系统
分时系统是把处理器的运行时间分成很短的时间片,按时间片轮流把处理机分配给各联机作业使用。 若某个作业在分配给它的时间片内不能完成其计算,则该作业暂时中断,把处理机让给另一作业使用,等待下一轮调度时再继续其运行。由于计算机速度很快,作业运行轮转得很快,给每个用户的感觉是他独占了一台计算机。而每个用户可以通过自己的终端向系统发出各种操作控制命令,在充分的人机交互情况下,完成作业的运行。为了解决分时系统不能及时响应用户指令的情况,又出现了能够在在严格的时间范围内完成事件处理,及时响应随机外部事件的实时系统。
通用操作系统
-
1960s:IBM的System/360系列的机器有了统一的操作系统OS/360。
-
1965年:AT&T的贝尔实验室加入GE和MIT的合作计划开始开发MULTICS。
-
1969年:MULTICS项目失败,Ken Tompson赋闲在家,为了玩“Space Travel”游戏用汇编语言在当时已经被淘汰的PDP-7上开发了Unics。
注:很难想象,Unix这么伟大的操作系统,居然是一个赋闲在家的程序员(关键是老婆回娘家还带上了孩子)在一台被淘汰的设备上为了玩游戏开发出来的。
-
1970年~1971年:Ken Thompson和Dennis Ritchie用B语言在PDP-11上重写了Unics,并在Brian Kernighan的建议下将其更名为Unix。

-
1972年~1973年:Dennis Ritchie发明了C语言来取代可移植性较差的B语言,并开启了用C语言重写Unix的工作。
-
1974年:Unix推出了里程碑意义的第5版,几乎完全用C语言来实现。
-
1979年:从Unix第7版开始,AT&T发布新的使用条款,将Unix私有化。
-
1987年:Andrew S. Tanenbaum教授为了能在课堂上为学生讲解操作系统运作的细节,决定在不使用任何AT&T的源代码前提下,自行开发与Unix兼容的操作系统以避免版权上的争议,该系统被命名为Minix。

-
1991年:Linus Torvalds就读于芬兰赫尔辛基大学期间,尝试在Minix上做一些开发工作,但因为Minix只是作为教学用途的操作系统,功能并不强大,为了方便在学校的新闻组和邮件系统中读写和下载文件,Linus编写了磁盘驱动程序和文件系统,这些东西形成了Linux系统内核的雏形。

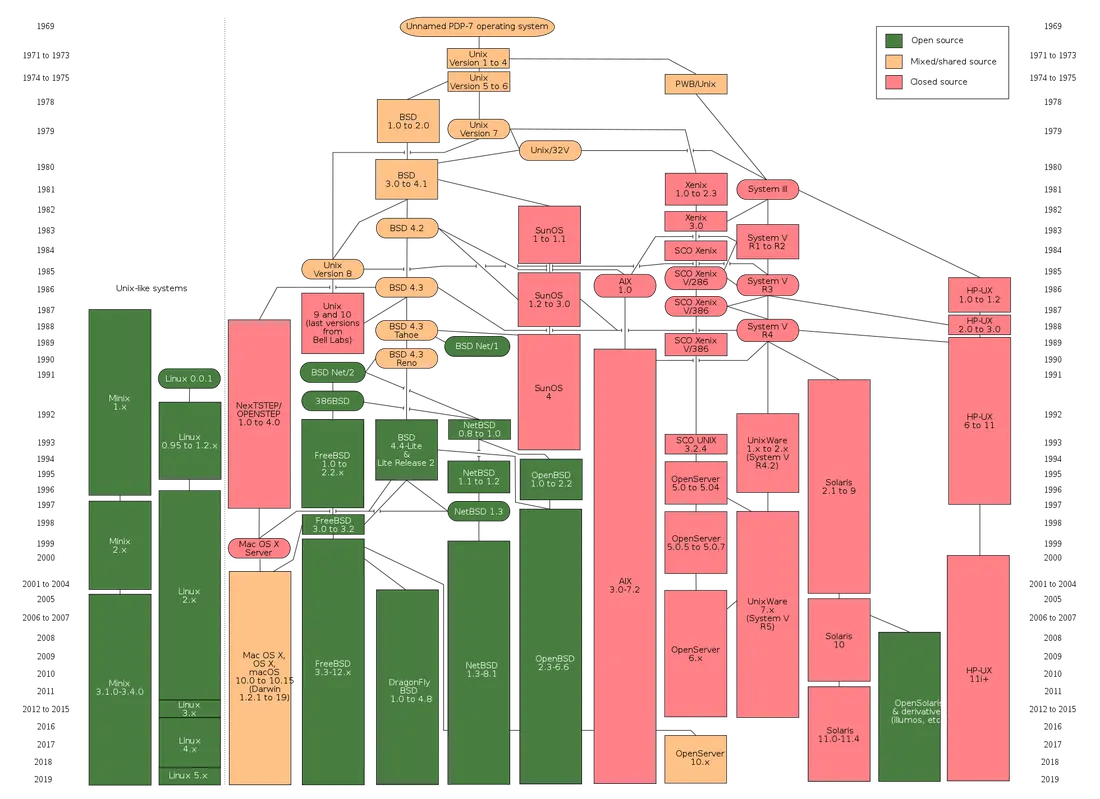
下图是Unix操作系统家族的图谱。
Linux概述
Linux是一个通用操作系统。一个操作系统要负责任务调度、内存分配、处理外围设备I/O等操作。操作系统通常由内核(运行其他程序,管理像磁盘、打印机等硬件设备的核心程序)和系统程序(设备驱动、底层库、shell、服务程序等)两部分组成。
Linux内核是芬兰人Linus Torvalds开发的,于1991年9月发布。而Linux操作系统作为Internet时代的产物,它是由全世界许多开发者共同合作开发的,是一个自由的操作系统(注意自由和免费并不是同一个概念,想了解二者的差别可以点击这里)。
Linux系统优点
- 通用操作系统,不跟特定的硬件绑定。
- 用C语言编写,可移植性强,有内核编程接口。
- 支持多用户和多任务,支持安全的分层文件系统。
- 大量的实用程序,完善的网络功能以及强大的支持文档。
- 可靠的安全性和良好的稳定性,对开发者更友好。
Linux系统发行版本
基础命令
Linux系统的命令通常都是如下所示的格式:
命令名称 [命名参数] [命令对象]-
获取登录信息 - w / who / last/ lastb。
Terminal window [root ~]# w23:31:16 up 12:16, 2 users, load average: 0.00, 0.01, 0.05USER TTY FROM LOGIN@ IDLE JCPU PCPU WHATroot pts/0 182.139.66.250 23:03 4.00s 0.02s 0.00s wjackfrue pts/1 182.139.66.250 23:26 3:56 0.00s 0.00s -bash[root ~]# whoroot pts/0 2018-04-12 23:03 (182.139.66.250)jackfrued pts/1 2018-04-12 23:26 (182.139.66.250)[root ~]# who am iroot pts/0 2018-04-12 23:03 (182.139.66.250)[root ~]# who mom likesroot pts/0 2018-04-12 23:03 (182.139.66.250)[root ~]# lastroot pts/0 117.136.63.184 Sun May 26 18:57 still logged inreboot system boot 3.10.0-957.10.1. Mon May 27 02:52 - 19:10 (-7:-42)root pts/4 117.136.63.184 Sun May 26 18:51 - crash (08:01)root pts/4 117.136.63.184 Sun May 26 18:49 - 18:49 (00:00)root pts/3 117.136.63.183 Sun May 26 18:35 - crash (08:17)root pts/2 117.136.63.183 Sun May 26 18:34 - crash (08:17)root pts/0 117.136.63.183 Sun May 26 18:10 - crash (08:42) -
查看自己使用的Shell - ps。
Shell也被称为“壳”或“壳程序”,它是用户与操作系统内核交流的翻译官,简单的说就是人与计算机交互的界面和接口。目前很多Linux系统默认的Shell都是bash(Bourne Again SHell),因为它可以使用tab键进行命令和路径补全、可以保存历史命令、可以方便的配置环境变量以及执行批处理操作。
Terminal window [root ~]# psPID TTY TIME CMD3531 pts/0 00:00:00 bash3553 pts/0 00:00:00 ps -
查看命令的说明和位置 - whatis / which / whereis。
Terminal window [root ~]# whatis psps (1) - report a snapshot of the current processes.[root ~]# whatis pythonpython (1) - an interpreted, interactive, object-oriented programming language[root ~]# whereis psps: /usr/bin/ps /usr/share/man/man1/ps.1.gz[root ~]# whereis pythonpython: /usr/bin/python /usr/bin/python2.7 /usr/lib/python2.7 /usr/lib64/python2.7 /etc/python /usr/include/python2.7 /usr/share/man/man1/python.1.gz[root ~]# which ps/usr/bin/ps[root ~]# which python/usr/bin/python -
清除屏幕上显示的内容 - clear。
-
查看帮助文档 - man / info / —help / apropos。
Terminal window [root@izwz97tbgo9lkabnat2lo8z ~]# ps --helpUsage:ps [options]Try 'ps --help <simple|list|output|threads|misc|all>'or 'ps --help <s|l|o|t|m|a>'for additional help text.For more details see ps(1).[root@izwz97tbgo9lkabnat2lo8z ~]# man psPS(1) User Commands PS(1)NAMEps - report a snapshot of the current processes.SYNOPSISps [options]DESCRIPTION... -
查看系统和主机名 - uname / hostname。
Terminal window [root@izwz97tbgo9lkabnat2lo8z ~]# unameLinux[root@izwz97tbgo9lkabnat2lo8z ~]# hostnameizwz97tbgo9lkabnat2lo8z[root@iZwz97tbgo9lkabnat2lo8Z ~]# cat /etc/centos-releaseCentOS Linux release 7.6.1810 (Core)说明:
cat是连接文件内容并打印到标准输出的命令,后面会讲到该命令;/etc是Linux系统上的一个非常重要的目录,它保存了很多的配置文件;centos-release是该目录下的一个文件,因为我自己使用的Linux发行版本是CentOS 7.6,因此这里会有一个这样的文件。 -
时间和日期 - date / cal。
Terminal window [root@iZwz97tbgo9lkabnat2lo8Z ~]# dateWed Jun 20 12:53:19 CST 2018[root@iZwz97tbgo9lkabnat2lo8Z ~]# calJune 2018Su Mo Tu We Th Fr Sa1 23 4 5 6 7 8 910 11 12 13 14 15 1617 18 19 20 21 22 2324 25 26 27 28 29 30[root@iZwz97tbgo9lkabnat2lo8Z ~]# cal 5 2017May 2017Su Mo Tu We Th Fr Sa1 2 3 4 5 67 8 9 10 11 12 1314 15 16 17 18 19 2021 22 23 24 25 26 2728 29 30 31 -
重启和关机 - reboot / shutdown。
Terminal window [root ~]# shutdown -h +5Shutdown scheduled for Sun 2019-05-26 19:34:27 CST, use 'shutdown -c' to cancel.[root ~]#Broadcast message from root (Sun 2019-05-26 19:29:27 CST):The system is going down for power-off at Sun 2019-05-26 19:34:27 CST![root ~]# shutdown -cBroadcast message from root (Sun 2019-05-26 19:30:22 CST):The system shutdown has been cancelled at Sun 2019-05-26 19:31:22 CST![root ~]# shutdown -r 23:58Shutdown scheduled for Sun 2019-05-26 23:58:00 CST, use 'shutdown -c' to cancel.[root ~]# shutdown -cBroadcast message from root (Sun 2019-05-26 19:31:06 CST):The system shutdown has been cancelled at Sun 2019-05-26 19:32:06 CST!说明:在执行
shutdown命令时会向登录系统的用户发出警告,可以在命令后面跟上警告消息来替换默认的警告消息,也可以在-h参数后通过now来表示立刻关机。 -
退出登录 - exit / logout。
-
查看历史命令 - history。
[root@iZwz97tbgo9lkabnat2lo8Z ~]# history...452 ls453 cd Python-3.6.5/454 clear455 history[root@iZwz97tbgo9lkabnat2lo8Z ~]# !454说明:查看到历史命令之后,可以用
!历史命令编号来重新执行该命令;通过history -c可以清除历史命令。
实用程序
文件和文件夹操作
-
创建/删除空目录 - mkdir / rmdir。
Terminal window [root ~]# mkdir abc[root ~]# mkdir -p xyz/abc[root ~]# rmdir abc -
创建/删除文件 - touch / rm。
Terminal window [root ~]# touch readme.txt[root ~]# touch error.txt[root ~]# rm error.txtrm: remove regular empty file ‘error.txt’? y[root ~]# rm -rf xyztouch命令用于创建空白文件或修改文件时间。在Linux系统中一个文件有三种时间:- 更改内容的时间 - mtime。
- 更改权限的时间 - ctime。
- 最后访问时间 - atime。
rm的几个重要参数:-i:交互式删除,每个删除项都会进行询问。-r:删除目录并递归的删除目录中的文件和目录。-f:强制删除,忽略不存在的文件,没有任何提示。
-
切换和查看当前工作目录 - cd / pwd。
说明:
cd命令后面可以跟相对路径(以当前路径作为参照)或绝对路径(以/开头)来切换到指定的目录,也可以用cd ..来返回上一级目录。请大家想一想,如果要返回到上上一级目录应该给cd命令加上什么样的参数呢? -
查看目录内容 - ls。
-l:以长格式查看文件和目录。-a:显示以点开头的文件和目录(隐藏文件)。-R:遇到目录要进行递归展开(继续列出目录下面的文件和目录)。-d:只列出目录,不列出其他内容。-S/-t:按大小/时间排序。
-
查看文件内容 - cat / tac / head / tail / more / less / rev / od。
Terminal window [root ~]# wget http://www.sohu.com/ -O sohu.html--2018-06-20 18:42:34-- http://www.sohu.com/Resolving www.sohu.com (www.sohu.com)... 14.18.240.6Connecting to www.sohu.com (www.sohu.com)|14.18.240.6|:80... connected.HTTP request sent, awaiting response... 200 OKLength: 212527 (208K) [text/html]Saving to: ‘sohu.html’100%[==================================================>] 212,527 --.-K/s in 0.03s2018-06-20 18:42:34 (7.48 MB/s) - ‘sohu.html’ saved [212527/212527][root ~]# cat sohu.html...[root ~]# head -10 sohu.html<!DOCTYPE html><html><head><title>搜狐</title><meta name="Keywords" content="搜狐,门户网站,新媒体,网络媒体,新闻,财经,体育,娱乐,时尚,汽车,房产,科技,图片,论坛,微博,博客,视频,电影,电视剧"/><meta name="Description" content="搜狐网为用户提供24小时不间断的最新资讯,及搜索、邮件等网络服务。内容包括全球热点事件、突发新闻、时事评论、热播影视剧、体育赛事、行业动态、生活服务信息,以及论坛、博客、微博、我的搜狐等互动空间。" /><meta name="shenma-site-verification" content="1237e4d02a3d8d73e96cbd97b699e9c3_1504254750"><meta charset="utf-8"/><meta http-equiv="X-UA-Compatible" content="IE=Edge,chrome=1"/>[root ~]# tail -2 sohu.html</body></html>[root ~]# less sohu.html...[root ~]# cat -n sohu.html | more...说明:上面用到了一个名为
wget的命令,它是一个网络下载器程序,可以从指定的URL下载资源。 -
拷贝/移动文件 - cp / mv。
Terminal window [root ~]# mkdir backup[root ~]# cp sohu.html backup/[root ~]# cd backup[root backup]# lssohu.html[root backup]# mv sohu.html sohu_index.html[root backup]# lssohu_index.html -
文件重命名 - rename。
[root@iZwz97tbgo9lkabnat2lo8Z ~]# rename .htm .html *.htm-
查找文件和查找内容 - find / grep。
Terminal window [root@iZwz97tbgo9lkabnat2lo8Z ~]# find / -name "*.html"/root/sohu.html/root/backup/sohu_index.html[root@izwz97tbgo9lkabnat2lo8z ~]# find . -atime 7 -type f -print[root@izwz97tbgo9lkabnat2lo8z ~]# find . -type f -size +2k[root@izwz97tbgo9lkabnat2lo8z ~]# find . -type f -name "*.swp" -delete[root@iZwz97tbgo9lkabnat2lo8Z ~]# grep "<script>" sohu.html -n20:<script>[root@iZwz97tbgo9lkabnat2lo8Z ~]# grep -E \<\/?script.*\> sohu.html -n20:<script>22:</script>24:<script src="//statics.itc.cn/web/v3/static/js/es5-shim-08e41cfc3e.min.js"></script>25:<script src="//statics.itc.cn/web/v3/static/js/es5-sham-1d5fa1124b.min.js"></script>26:<script src="//statics.itc.cn/web/v3/static/js/html5shiv-21fc8c2ba6.js"></script>29:<script type="text/javascript">52:</script>...说明:
grep在搜索字符串时可以使用正则表达式,如果需要使用正则表达式可以用grep -E或者直接使用egrep。 -
创建链接和查看链接 - ln / readlink。
Terminal window [root@iZwz97tbgo9lkabnat2lo8Z ~]# ls -l sohu.html-rw-r--r-- 1 root root 212131 Jun 20 19:15 sohu.html[root@iZwz97tbgo9lkabnat2lo8Z ~]# ln /root/sohu.html /root/backup/sohu_backup[root@iZwz97tbgo9lkabnat2lo8Z ~]# ls -l sohu.html-rw-r--r-- 2 root root 212131 Jun 20 19:15 sohu.html[root@iZwz97tbgo9lkabnat2lo8Z ~]# ln /root/sohu.html /root/backup/sohu_backup2[root@iZwz97tbgo9lkabnat2lo8Z ~]# ls -l sohu.html-rw-r--r-- 3 root root 212131 Jun 20 19:15 sohu.html[root@iZwz97tbgo9lkabnat2lo8Z ~]# ln -s /etc/centos-release sysinfo[root@iZwz97tbgo9lkabnat2lo8Z ~]# ls -l sysinfolrwxrwxrwx 1 root root 19 Jun 20 19:21 sysinfo -> /etc/centos-release[root@iZwz97tbgo9lkabnat2lo8Z ~]# cat sysinfoCentOS Linux release 7.4.1708 (Core)[root@iZwz97tbgo9lkabnat2lo8Z ~]# cat /etc/centos-releaseCentOS Linux release 7.4.1708 (Core)说明:链接可以分为硬链接和软链接(符号链接)。硬链接可以认为是一个指向文件数据的指针,就像Python中对象的引用计数,每添加一个硬链接,文件的对应链接数就增加1,只有当文件的链接数为0时,文件所对应的存储空间才有可能被其他文件覆盖。我们平常删除文件时其实并没有删除硬盘上的数据,我们删除的只是一个指针,或者说是数据的一条使用记录,所以类似于“文件粉碎机”之类的软件在“粉碎”文件时除了删除文件指针,还会在文件对应的存储区域填入数据来保证文件无法再恢复。软链接类似于Windows系统下的快捷方式,当软链接链接的文件被删除时,软链接也就失效了。
-
压缩/解压缩和归档/解归档 - gzip / gunzip / xz。
[root@iZwz97tbgo9lkabnat2lo8Z ~]# wget http://download.redis.io/releases/redis-4.0.10.tar.gz--2018-06-20 19:29:59-- http://download.redis.io/releases/redis-4.0.10.tar.gzResolving download.redis.io (download.redis.io)... 109.74.203.151Connecting to download.redis.io (download.redis.io)|109.74.203.151|:80... connected.HTTP request sent, awaiting response... 200 OKLength: 1738465 (1.7M) [application/x-gzip]Saving to: ‘redis-4.0.10.tar.gz’100%[==================================================>] 1,738,465 70.1KB/s in 74s2018-06-20 19:31:14 (22.9 KB/s) - ‘redis-4.0.10.tar.gz’ saved [1738465/1738465][root@iZwz97tbgo9lkabnat2lo8Z ~]# ls redis*redis-4.0.10.tar.gz[root@iZwz97tbgo9lkabnat2lo8Z ~]# gunzip redis-4.0.10.tar.gz[root@iZwz97tbgo9lkabnat2lo8Z ~]# ls redis*redis-4.0.10.tar- 归档和解归档 - tar。
[root@iZwz97tbgo9lkabnat2lo8Z ~]# tar -xvf redis-4.0.10.tarredis-4.0.10/redis-4.0.10/.gitignoreredis-4.0.10/00-RELEASENOTESredis-4.0.10/BUGSredis-4.0.10/CONTRIBUTINGredis-4.0.10/COPYINGredis-4.0.10/INSTALLredis-4.0.10/MANIFESTOredis-4.0.10/Makefileredis-4.0.10/README.mdredis-4.0.10/deps/redis-4.0.10/deps/Makefileredis-4.0.10/deps/README.md...说明:归档(也称为创建归档)和解归档都使用
tar命令,通常创建归档需要-cvf三个参数,其中c表示创建(create),v表示显示创建归档详情(verbose),f表示指定归档的文件(file);解归档需要加上-xvf参数,其中x表示抽取(extract),其他两个参数跟创建归档相同。
- 将标准输入转成命令行参数 - xargs。
下面的命令会将查找当前路径下的html文件,然后通过xargs将这些文件作为参数传给rm命令,实现查找并删除文件的操作。
[root@iZwz97tbgo9lkabnat2lo8Z ~]# find . -type f -name "*.html" | xargs rm -f下面的命令将a.txt文件中的多行内容变成一行输出到b.txt文件中,其中<表示从a.txt中读取输入,>表示将命令的执行结果输出到b.txt中。
[root@iZwz97tbgo9lkabnat2lo8Z ~]# xargs < a.txt > b.txt说明:这个命令就像上面演示的那样常在管道(实现进程间通信的一种方式)和重定向(重新指定输入输出的位置)操作中用到,后面的内容中会讲到管道操作和输入输出重定向操作。
-
显示文件或目录 - basename / dirname。
-
其他相关工具。
- sort - 对内容排序
- uniq - 去掉相邻重复内容
- tr - 替换指定内容为新内容
- cut / paste - 剪切/黏贴内容
- split - 拆分文件
- file - 判断文件类型
- wc - 统计文件行数、单词数、字节数
- iconv - 编码转换
[root ~]# cat foo.txtgrapeapplepitaya[root ~]# cat bar.txt100200300400[root ~]# paste foo.txt bar.txtgrape 100apple 200pitaya 300 400[root ~]# paste foo.txt bar.txt > hello.txt[root ~]# cut -b 4-8 hello.txtpe 10le 20aya 30[root ~]# cat hello.txt | tr '\t' ','grape,100apple,200pitaya,300,400[root ~]# split -l 100 sohu.html hello[root ~]# wget https://www.baidu.com/img/bd_logo1.png[root ~]# file bd_logo1.pngbd_logo1.png: PNG image data, 540 x 258, 8-bit colormap, non-interlaced[root ~]# wc sohu.html 2979 6355 212527 sohu.html[root ~]# wc -l sohu.html2979 sohu.html[root ~]# wget http://www.qq.com -O qq.html[root ~]# iconv -f gb2312 -t utf-8 qq.html管道和重定向
-
管道的使用 - |。
例子:查找当前目录下文件个数。
Terminal window [root ~]# find ./ | wc -l6152例子:列出当前路径下的文件和文件夹,给每一项加一个编号。
Terminal window [root ~]# ls | cat -n1 dump.rdb2 mongodb-3.6.53 Python-3.6.54 redis-3.2.115 redis.conf例子:查找record.log中包含AAA,但不包含BBB的记录的总数
Terminal window [root ~]# cat record.log | grep AAA | grep -v BBB | wc -l -
输出重定向和错误重定向 - > / >> / 2>。
Terminal window [root ~]# cat readme.txtbananaapplegrapeapplegrapewatermelonpearpitaya[root ~]# cat readme.txt | sort | uniq > result.txt[root ~]# cat result.txtapplebananagrapepearpitayawatermelon -
输入重定向 - <。
Terminal window [root ~]# echo 'hello, world!' > hello.txt[root ~]# wall < hello.txt[root ~]#Broadcast message from root (Wed Jun 20 19:43:05 2018):hello, world![root ~]# echo 'I will show you some code.' >> hello.txt[root ~]# wall < hello.txt[root ~]#Broadcast message from root (Wed Jun 20 19:43:55 2018):hello, world!I will show you some code. -
多重定向 - tee。
下面的命令除了在终端显示命令
ls的结果之外,还会追加输出到ls.txt文件中。Terminal window [root ~]# ls | tee -a ls.txt
别名
-
alias
Terminal window [root ~]# alias ll='ls -l'[root ~]# alias frm='rm -rf'[root ~]# ll...drwxr-xr-x 2 root root 4096 Jun 20 12:52 abc...[root ~]# frm abc -
unalias
Terminal window [root ~]# unalias frm[root ~]# frm sohu.html-bash: frm: command not found
文本处理
-
字符流编辑器 - sed。
sed是操作、过滤和转换文本内容的工具。假设有一个名为fruit.txt的文件,内容如下所示。
Terminal window [root ~]# cat -n fruit.txt1 banana2 grape3 apple4 watermelon5 orange接下来,我们在第2行后面添加一个pitaya。
Terminal window [root ~]# sed '2a pitaya' fruit.txtbananagrapepitayaapplewatermelonorange注意:刚才的命令和之前我们讲过的很多命令一样并没有改变fruit.txt文件,而是将添加了新行的内容输出到终端中,如果想保存到fruit.txt中,可以使用输出重定向操作。
在第2行前面插入一个waxberry。
Terminal window [root ~]# sed '2i waxberry' fruit.txtbananawaxberrygrapeapplewatermelonorange删除第3行。
Terminal window [root ~]# sed '3d' fruit.txtbananagrapewatermelonorange删除第2行到第4行。
Terminal window [root ~]# sed '2,4d' fruit.txtbananaorange将文本中的字符a替换为@。
Terminal window [root ~]# sed 's#a#@#' fruit.txtb@nanagr@pe@pplew@termelonor@nge将文本中的字符a替换为@,使用全局模式。
Terminal window [root ~]# sed 's#a#@#g' fruit.txtb@n@n@gr@pe@pplew@termelonor@nge -
模式匹配和处理语言 - awk。
awk是一种编程语言,也是Linux系统中处理文本最为强大的工具,它的作者之一和现在的维护者就是之前提到过的Brian Kernighan(ken和dmr最亲密的伙伴)。通过该命令可以从文本中提取出指定的列、用正则表达式从文本中取出我们想要的内容、显示指定的行以及进行统计和运算,总之它非常强大。
假设有一个名为fruit2.txt的文件,内容如下所示。
Terminal window [root ~]# cat fruit2.txt1 banana 1202 grape 5003 apple 12304 watermelon 805 orange 400显示文件的第3行。
Terminal window [root ~]# awk 'NR==3' fruit2.txt3 apple 1230显示文件的第2列。
Terminal window [root ~]# awk '{print $2}' fruit2.txtbananagrapeapplewatermelonorange显示文件的最后一列。
Terminal window [root ~]# awk '{print $NF}' fruit2.txt120500123080400输出末尾数字大于等于300的行。
Terminal window [root ~]# awk '{if($3 >= 300) {print $0}}' fruit2.txt2 grape 5003 apple 12305 orange 400上面展示的只是awk命令的冰山一角,更多的内容留给读者自己在实践中去探索。
用户管理
-
创建和删除用户 - useradd / userdel。
Terminal window [root home]# useradd hellokitty[root home]# userdel hellokitty-d- 创建用户时为用户指定用户主目录-g- 创建用户时指定用户所属的用户组
-
创建和删除用户组 - groupadd / groupdel。
说明:用户组主要是为了方便对一个组里面所有用户的管理。
-
修改密码 - passwd。
Terminal window [root ~]# passwd hellokittyNew password:Retype new password:passwd: all authentication tokens updated successfully.说明:输入密码和确认密码没有回显且必须一气呵成的输入完成(不能使用退格键),密码和确认密码需要一致。如果使用
passwd命令时没有指定命令作用的对象,则表示要修改当前用户的密码。如果想批量修改用户密码,可以使用chpasswd命令。-l/-u- 锁定/解锁用户。-d- 清除用户密码。-e- 设置密码立即过期,用户登录时会强制要求修改密码。-i- 设置密码过期多少天以后禁用该用户。
-
查看和修改密码有效期 - chage。
设置hellokitty用户100天后必须修改密码,过期前15天通知该用户,过期后7天禁用该用户。
Terminal window chage -M 100 -W 15 -I 7 hellokitty -
切换用户 - su。
Terminal window [root ~]# su hellokitty[hellokitty root]$ -
以管理员身份执行命令 - sudo。
Terminal window [hellokitty ~]$ ls /rootls: cannot open directory /root: Permission denied[hellokitty ~]$ sudo ls /root[sudo] password for hellokitty:说明:如果希望用户能够以管理员身份执行命令,用户必须要出现在sudoers名单中,sudoers文件在
/etc目录下,如果希望直接编辑该文件也可以使用下面的命令。 -
编辑sudoers文件 - visudo。
这里使用的编辑器是vi,关于vi的知识在后面有讲解。该文件的部分内容如下所示:
## Allow root to run any commands anywhereroot ALL=(ALL) ALL## Allows members of the 'sys' group to run networking, software,## service management apps and more.# %sys ALL = NETWORKING, SOFTWARE, SERVICES, STORAGE, DELEGATING, PROCESSES, LOCATE, DRIVERS## Allows people in group wheel to run all commands%wheel ALL=(ALL) ALL## Same thing without a password# %wheel ALL=(ALL) NOPASSWD: ALL## Allows members of the users group to mount and unmount the## cdrom as root# %users ALL=/sbin/mount /mnt/cdrom, /sbin/umount /mnt/cdrom## Allows members of the users group to shutdown this system# %users localhost=/sbin/shutdown -h now -
显示用户与用户组的信息 - id。
-
给其他用户发消息 -write / wall。
发送方:
Terminal window [root ~]# write hellokittyDinner is on me.Call me at 6pm.接收方:
Terminal window [hellokitty ~]$Message from root on pts/0 at 17:41 ...Dinner is on me.Call me at 6pm.EOF -
查看/设置是否接收其他用户发送的消息 - mesg。
[hellokitty ~]$ mesgis y[hellokitty ~]$ mesg n[hellokitty ~]$ mesgis n文件系统
文件和路径
- 命名规则:文件名的最大长度与文件系统类型有关,一般情况下,文件名不应该超过255个字符,虽然绝大多数的字符都可以用于文件名,但是最好使用英文大小写字母、数字、下划线、点这样的符号。文件名中虽然可以使用空格,但应该尽可能避免使用空格,否则在输入文件名时需要用将文件名放在双引号中或者通过
\对空格进行转义。 - 扩展名:在Linux系统下文件的扩展名是可选的,但是使用扩展名有助于对文件内容的理解。有些应用程序要通过扩展名来识别文件,但是更多的应用程序并不依赖文件的扩展名,就像
file命令在识别文件时并不是依据扩展名来判定文件的类型。 - 隐藏文件:以点开头的文件在Linux系统中是隐藏文件(不可见文件)。
目录结构
- /bin - 基本命令的二进制文件。
- /boot - 引导加载程序的静态文件。
- /dev - 设备文件。
- /etc - 配置文件。
- /home - 普通用户主目录的父目录。
- /lib - 共享库文件。
- /lib64 - 共享64位库文件。
- /lost+found - 存放未链接文件。
- /media - 自动识别设备的挂载目录。
- /mnt - 临时挂载文件系统的挂载点。
- /opt - 可选插件软件包安装位置。
- /proc - 内核和进程信息。
- /root - 超级管理员用户主目录。
- /run - 存放系统运行时需要的东西。
- /sbin - 超级用户的二进制文件。
- /sys - 设备的伪文件系统。
- /tmp - 临时文件夹。
- /usr - 用户应用目录。
- /var - 变量数据目录。
访问权限
-
chmod - 改变文件模式比特。
Terminal window [root ~]# ls -l...-rw-r--r-- 1 root root 211878 Jun 19 16:06 sohu.html...[root ~]# chmod g+w,o+w sohu.html[root ~]# ls -l...-rw-rw-rw- 1 root root 211878 Jun 19 16:06 sohu.html...[root ~]# chmod 644 sohu.html[root ~]# ls -l...-rw-r--r-- 1 root root 211878 Jun 19 16:06 sohu.html...说明:通过上面的例子可以看出,用
chmod改变文件模式比特有两种方式:一种是字符设定法,另一种是数字设定法。除了chmod之外,可以通过umask来设定哪些权限将在新文件的默认权限中被删除。长格式查看目录或文件时显示结果及其对应权限的数值如下表所示。
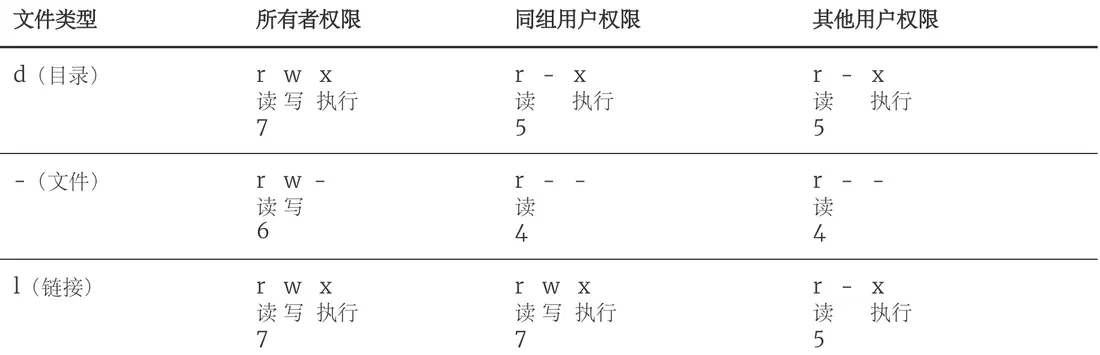
-
chown - 改变文件所有者。
Terminal window [root ~]# ls -l...-rw-r--r-- 1 root root 54 Jun 20 10:06 readme.txt...[root ~]# chown hellokitty readme.txt[root ~]# ls -l...-rw-r--r-- 1 hellokitty root 54 Jun 20 10:06 readme.txt... -
chgrp - 改变用户组。
磁盘管理
-
列出文件系统的磁盘使用状况 - df。
Terminal window [root ~]# df -hFilesystem Size Used Avail Use% Mounted on/dev/vda1 40G 5.0G 33G 14% /devtmpfs 486M 0 486M 0% /devtmpfs 497M 0 497M 0% /dev/shmtmpfs 497M 356K 496M 1% /runtmpfs 497M 0 497M 0% /sys/fs/cgrouptmpfs 100M 0 100M 0% /run/user/0 -
磁盘分区表操作 - fdisk。
Terminal window [root ~]# fdisk -lDisk /dev/vda: 42.9 GB, 42949672960 bytes, 83886080 sectorsUnits = sectors of 1 * 512 = 512 bytesSector size (logical/physical): 512 bytes / 512 bytesI/O size (minimum/optimal): 512 bytes / 512 bytesDisk label type: dosDisk identifier: 0x000a42f4Device Boot Start End Blocks Id System/dev/vda1 * 2048 83884031 41940992 83 LinuxDisk /dev/vdb: 21.5 GB, 21474836480 bytes, 41943040 sectorsUnits = sectors of 1 * 512 = 512 bytesSector size (logical/physical): 512 bytes / 512 bytesI/O size (minimum/optimal): 512 bytes / 512 bytes -
磁盘分区工具 - parted。
-
格式化文件系统 - mkfs。
Terminal window [root ~]# mkfs -t ext4 -v /dev/sdb-t- 指定文件系统的类型。-c- 创建文件系统时检查磁盘损坏情况。-v- 显示详细信息。
-
文件系统检查 - fsck。
-
转换或拷贝文件 - dd。
-
挂载/卸载 - mount / umount。
-
创建/激活/关闭交换分区 - mkswap / swapon / swapoff。
说明:执行上面这些命令会带有一定的风险,如果不清楚这些命令的用法,最好不用随意使用,在使用的过程中,最好对照参考资料进行操作,并在操作前确认是否要这么做。
编辑器 - vim
-
启动vim。可以通过
vi或vim命令来启动vim,启动时可以指定文件名来打开一个文件,如果没有指定文件名,也可以在保存的时候指定文件名。Terminal window [root ~]# vim guess.py -
命令模式、编辑模式和末行模式:启动vim进入的是命令模式(也称为Normal模式),在命令模式下输入英文字母
i会进入编辑模式(Insert模式),屏幕下方出现-- INSERT --提示;在编辑模式下按下Esc会回到命令模式,此时如果输入英文:会进入末行模式,在末行模式下输入q!可以在不保存当前工作的情况下强行退出vim;在命令模式下输入v会进入可视模式(Visual模式),可以用光标选择一个区域再完成对应的操作。 -
保存和退出vim:在命令模式下输入
:进入末行模式,输入wq可以实现保存退出;如果想放弃编辑的内容输入q!强行退出,这一点刚才已经提到过了;在命令模式下也可以直接输入ZZ实现保存退出。如果只想保存文件不退出,那么可以在末行模式下输入w;可以在w后面输入空格再指定要保存的文件名。 -
光标操作。
- 在命令模式下可以通过
h、j、k、l来控制光标向左、下、上、右的方向移动,可以在字母前输入数字来表示移动的距离,例如:10h表示向左移动10个字符。 - 在命令模式下可以通过
Ctrl+y和Ctrl+e来实现向上、向下滚动一行文本的操作,可以通过Ctrl+f和Ctrl+b来实现向前和向后翻页的操作。 - 在命令模式下可以通过输入英文字母
G将光标移到文件的末尾,可以通过gg将光标移到文件的开始,也可以通过在G前输入数字来将光标移动到指定的行。
- 在命令模式下可以通过
-
文本操作。
- 删除:在命令模式下可以用
dd来删除整行;可以在dd前加数字来指定删除的行数;可以用d$来实现删除从光标处删到行尾的操作,也可以通过d0来实现从光标处删到行首的操作;如果想删除一个单词,可以使用dw;如果要删除全文,可以在输入:%d(其中:用来从命令模式进入末行模式)。 - 复制和粘贴:在命令模式下可以用
yy来复制整行;可以在yy前加数字来指定复制的行数;可以通过p将复制的内容粘贴到光标所在的地方。 - 撤销和恢复:在命令模式下输入
u可以撤销之前的操作;通过Ctrl+r可以恢复被撤销的操作。 - 对内容进行排序:在命令模式下输入
%!sort。
- 删除:在命令模式下可以用
-
查找和替换。
- 查找操作需要输入
/进入末行模式并提供正则表达式来匹配与之对应的内容,例如:/doc.*\.,输入n来向前搜索,也可以输入N来向后搜索。 - 替换操作需要输入
:进入末行模式并指定搜索的范围、正则表达式以及替换后的内容和匹配选项,例如::1,$s/doc.*/hello/gice,其中:g- global:全局匹配。i- ignore case:忽略大小写匹配。c- confirm:替换时需要确认。e- error:忽略错误。
- 查找操作需要输入
-
参数设定:在输入
:进入末行模式后可以对vim进行设定。-
设置Tab键的空格数:
set ts=4 -
设置显示/不显示行号:
set nu/set nonu -
设置启用/关闭高亮语法:
syntax on/syntax off -
设置显示标尺(光标所在的行和列):
set ruler -
设置启用/关闭搜索结果高亮:
set hls/set nohls说明:如果希望上面的这些设定在每次启动vim时都能自动生效,需要将这些设定写到用户主目录下的.vimrc文件中。
-
-
高级技巧
-
比较多个文件。
Terminal window [root ~]# vim -d foo.txt bar.txt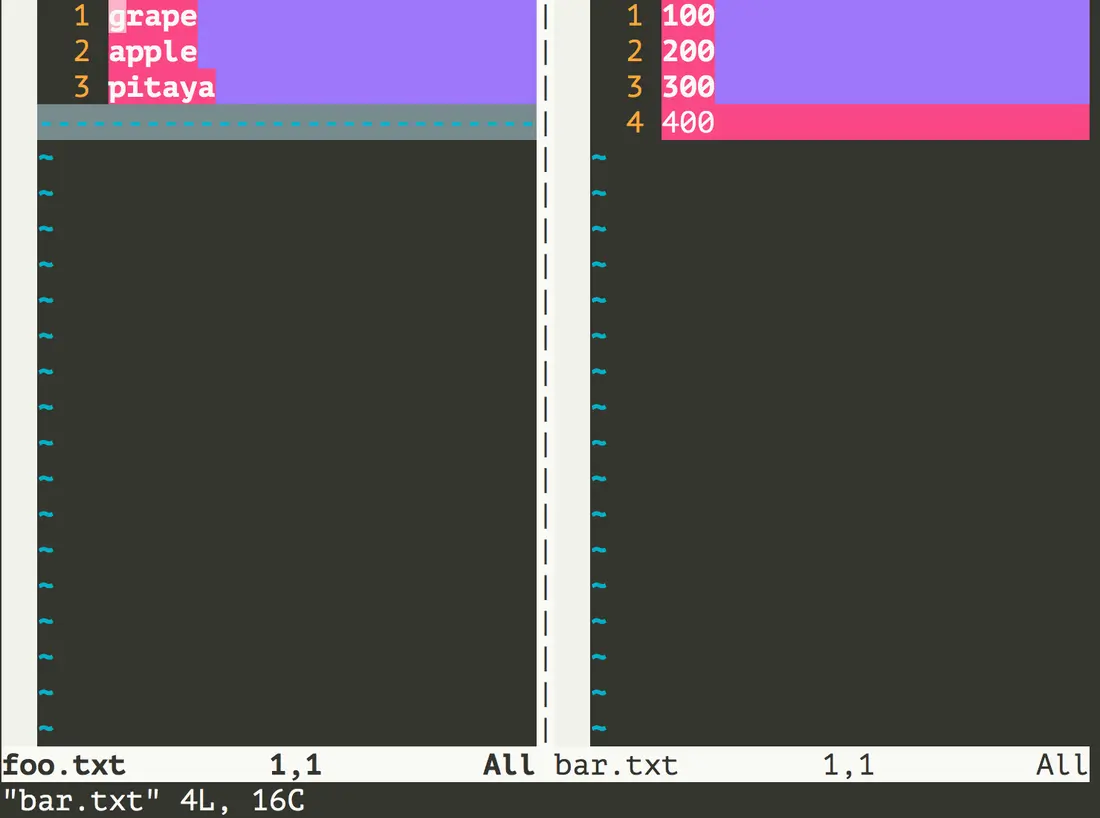
-
打开多个文件。
Terminal window [root ~]# vim foo.txt bar.txt hello.txt启动vim后只有一个窗口显示的是foo.txt,可以在末行模式中输入
ls查看到打开的三个文件,也可以在末行模式中输入b <num>来显示另一个文件,例如可以用:b 2将bar.txt显示出来,可以用:b 3将hello.txt显示出来。 -
拆分和切换窗口。
可以在末行模式中输入
sp或vs来实现对窗口的水平或垂直拆分,这样我们就可以同时打开多个编辑窗口,通过按两次Ctrl+w就可以实现编辑窗口的切换,在一个窗口中执行退出操作只会关闭对应的窗口,其他的窗口继续保留。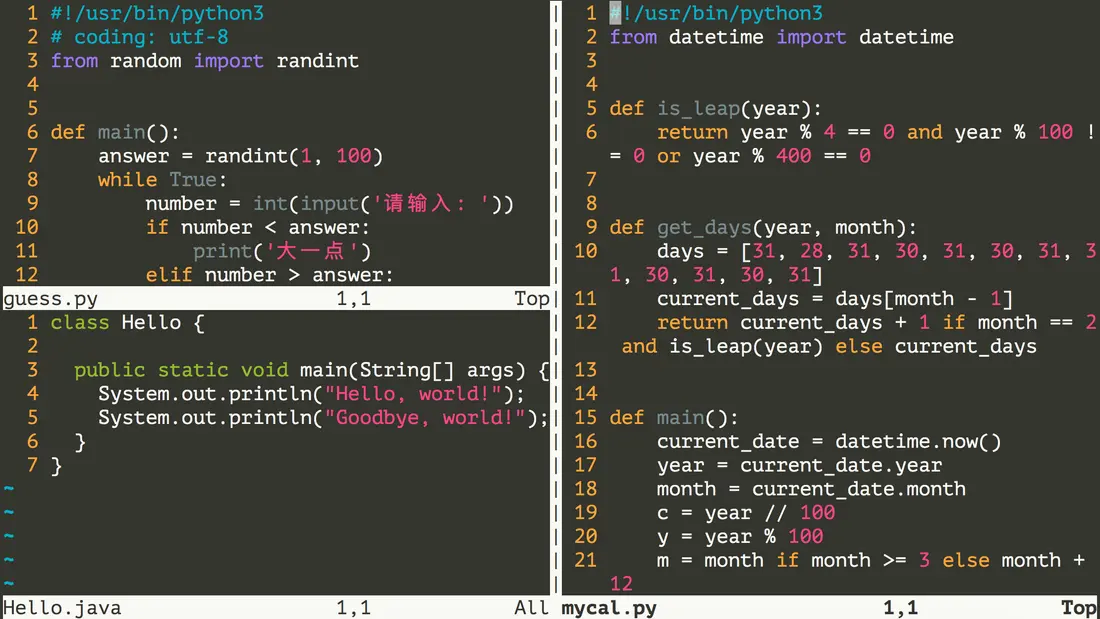
-
映射快捷键:在vim下可以将一些常用操作映射为快捷键来提升工作效率。
-
例子1:在命令模式下输入
F4执行从第一行开始删除10000行代码的操作。:map <F4> gg10000dd。例子2:在编辑模式下输入
__main直接补全为if __name__ == '__main__':。:inoremap __main if __name__ == '__main__':
说明:上面例子2的
inoremap中的i表示映射的键在编辑模式使用,nore表示不要递归,这一点非常重要,否则如果键对应的内容中又出现键本身,就会引发递归(相当于进入了死循环)。如果希望映射的快捷键每次启动vim时都能生效,需要将映射写到用户主目录下的.vimrc文件中。 -
-
录制宏。
-
在命令模式下输入
qa开始录制宏(其中a是寄存器的名字,也可以是其他英文字母或0-9的数字)。 -
执行你的操作(光标操作、编辑操作等),这些操作都会被录制下来。
-
如果录制的操作已经完成了,按
q结束录制。 -
通过
@a(a是刚才使用的寄存器的名字)播放宏,如果要多次执行宏可以在前面加数字,例如100@a表示将宏播放100次。 -
可以试一试下面的例子来体验录制宏的操作,该例子来源于Harttle Land网站,该网站上提供了很多关于vim的使用技巧,有兴趣的可以了解一下。
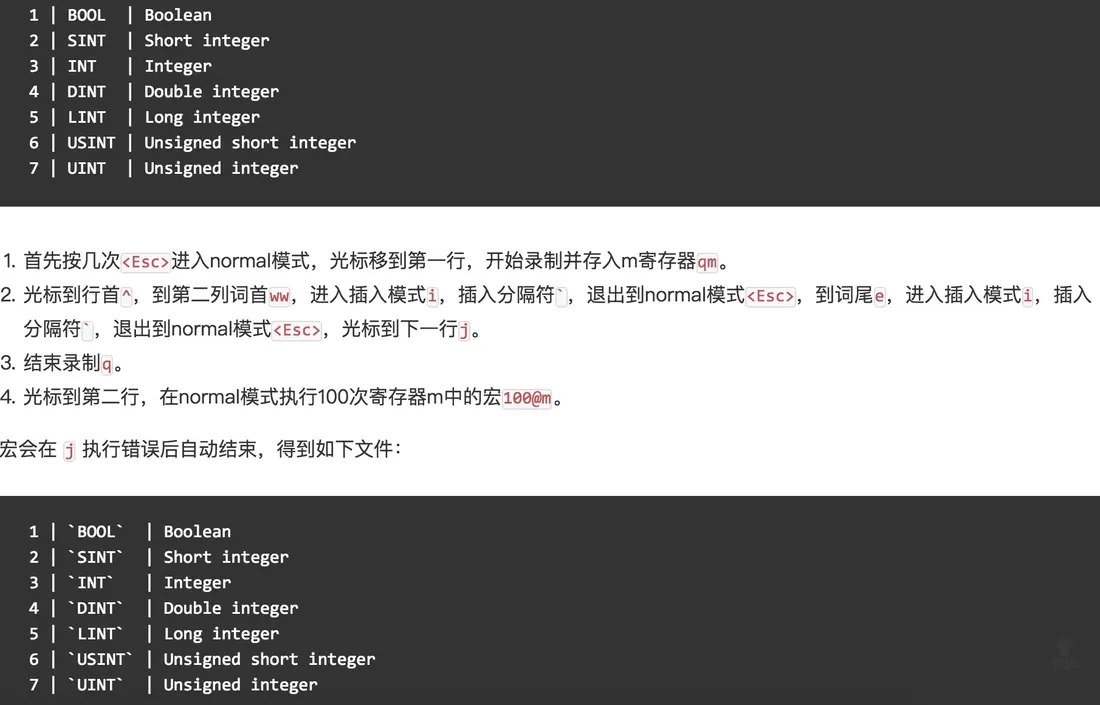
-
-
软件安装和配置
使用包管理工具
- yum - Yellowdog Updater Modified。
yum search:搜索软件包,例如yum search nginx。yum list installed:列出已经安装的软件包,例如yum list installed | grep zlib。yum install:安装软件包,例如yum install nginx。yum remove:删除软件包,例如yum remove nginx。yum update:更新软件包,例如yum update可以更新所有软件包,而yum update tar只会更新tar。yum check-update:检查有哪些可以更新的软件包。yum info:显示软件包的相关信息,例如yum info nginx。
- rpm - Redhat Package Manager。
- 安装软件包:
rpm -ivh <packagename>.rpm。 - 移除软件包:
rpm -e <packagename>。 - 查询软件包:
rpm -qa,例如可以用rpm -qa | grep mysql来检查是否安装了MySQL相关的软件包。
- 安装软件包:
下面以Nginx为例,演示如何使用yum安装软件。
[root ~]# yum -y install nginx...Installed: nginx.x86_64 1:1.12.2-2.el7Dependency Installed: nginx-all-modules.noarch 1:1.12.2-2.el7 nginx-mod-http-geoip.x86_64 1:1.12.2-2.el7 nginx-mod-http-image-filter.x86_64 1:1.12.2-2.el7 nginx-mod-http-perl.x86_64 1:1.12.2-2.el7 nginx-mod-http-xslt-filter.x86_64 1:1.12.2-2.el7 nginx-mod-mail.x86_64 1:1.12.2-2.el7 nginx-mod-stream.x86_64 1:1.12.2-2.el7Complete![root ~]# yum info nginxLoaded plugins: fastestmirrorLoading mirror speeds from cached hostfileInstalled PackagesName : nginxArch : x86_64Epoch : 1Version : 1.12.2Release : 2.el7Size : 1.5 MRepo : installedFrom repo : epelSummary : A high performance web server and reverse proxy serverURL : http://nginx.org/License : BSDDescription : Nginx is a web server and a reverse proxy server for HTTP, SMTP, POP3 and : IMAP protocols, with a strong focus on high concurrency, performance and low : memory usage.[root ~]# nginx -vnginx version: nginx/1.12.2移除Nginx。
[root ~]# yum -y remove nginx下面以MySQL为例,演示如何使用rpm安装软件。要安装MySQL需要先到MySQL官方网站下载对应的RPM文件,当然要选择和你使用的Linux系统对应的版本。MySQL现在是Oracle公司旗下的产品,在MySQL被收购后,MySQL的作者重新制作了一个MySQL的分支MariaDB,可以通过yum进行安装。
[root mysql]# lsmysql-community-client-5.7.22-1.el7.x86_64.rpmmysql-community-common-5.7.22-1.el7.x86_64.rpmmysql-community-libs-5.7.22-1.el7.x86_64.rpmmysql-community-server-5.7.22-1.el7.x86_64.rpm[root mysql]# yum -y remove mariadb-libs[root mysql]# yum -y install libaio[root mysql]#rpm -ivh mysql-community-common-5.7.26-1.el7.x86_64.rpm...[root mysql]#rpm -ivh mysql-community-libs-5.7.26-1.el7.x86_64.rpm...[root mysql]#rpm -ivh mysql-community-client-5.7.26-1.el7.x86_64.rpm...[root mysql]#rpm -ivh mysql-community-server-5.7.26-1.el7.x86_64.rpm...说明:由于MySQL和MariaDB的底层依赖库是有冲突的,所以上面我们首先用
yum移除了名为mariadb-libs的依赖库并安装了名为libaio支持异步I/O操作的依赖库。关于MySQL和MariaDB之间的关系,可以阅读维基百科上关于MariaDB的介绍。
移除安装的MySQL。
[root ~]# rpm -qa | grep mysql | xargs rpm -e下载解压配置环境变量
下面以安装MongoDB为例,演示这类软件应该如何安装。
[root ~]# wget https://fastdl.mongodb.org/linux/mongodb-linux-x86_64-rhel70-3.6.5.tgz--2018-06-21 18:32:53-- https://fastdl.mongodb.org/linux/mongodb-linux-x86_64-rhel70-3.6.5.tgzResolving fastdl.mongodb.org (fastdl.mongodb.org)... 52.85.83.16, 52.85.83.228, 52.85.83.186, ...Connecting to fastdl.mongodb.org (fastdl.mongodb.org)|52.85.83.16|:443... connected.HTTP request sent, awaiting response... 200 OKLength: 100564462 (96M) [application/x-gzip]Saving to: ‘mongodb-linux-x86_64-rhel70-3.6.5.tgz’100%[==================================================>] 100,564,462 630KB/s in 2m 9s2018-06-21 18:35:04 (760 KB/s) - ‘mongodb-linux-x86_64-rhel70-3.6.5.tgz’ saved [100564462/100564462][root ~]# gunzip mongodb-linux-x86_64-rhel70-3.6.5.tgz[root ~]# tar -xvf mongodb-linux-x86_64-rhel70-3.6.5.tarmongodb-linux-x86_64-rhel70-3.6.5/READMEmongodb-linux-x86_64-rhel70-3.6.5/THIRD-PARTY-NOTICESmongodb-linux-x86_64-rhel70-3.6.5/MPL-2mongodb-linux-x86_64-rhel70-3.6.5/GNU-AGPL-3.0mongodb-linux-x86_64-rhel70-3.6.5/bin/mongodumpmongodb-linux-x86_64-rhel70-3.6.5/bin/mongorestoremongodb-linux-x86_64-rhel70-3.6.5/bin/mongoexportmongodb-linux-x86_64-rhel70-3.6.5/bin/mongoimportmongodb-linux-x86_64-rhel70-3.6.5/bin/mongostatmongodb-linux-x86_64-rhel70-3.6.5/bin/mongotopmongodb-linux-x86_64-rhel70-3.6.5/bin/bsondumpmongodb-linux-x86_64-rhel70-3.6.5/bin/mongofilesmongodb-linux-x86_64-rhel70-3.6.5/bin/mongoreplaymongodb-linux-x86_64-rhel70-3.6.5/bin/mongoperfmongodb-linux-x86_64-rhel70-3.6.5/bin/mongodmongodb-linux-x86_64-rhel70-3.6.5/bin/mongosmongodb-linux-x86_64-rhel70-3.6.5/bin/mongomongodb-linux-x86_64-rhel70-3.6.5/bin/install_compass[root ~]# vim .bash_profile...PATH=$PATH:$HOME/bin:$HOME/mongodb-linux-x86_64-rhel70-3.6.5/binexport PATH...[root ~]# source .bash_profile[root ~]# mongod --versiondb version v3.6.5git version: a20ecd3e3a174162052ff99913bc2ca9a839d618OpenSSL version: OpenSSL 1.0.1e-fips 11 Feb 2013allocator: tcmallocmodules: nonebuild environment: distmod: rhel70 distarch: x86_64 target_arch: x86_64[root ~]# mongo --versionMongoDB shell version v3.6.5git version: a20ecd3e3a174162052ff99913bc2ca9a839d618OpenSSL version: OpenSSL 1.0.1e-fips 11 Feb 2013allocator: tcmallocmodules: nonebuild environment: distmod: rhel70 distarch: x86_64 target_arch: x86_64说明:当然也可以通过yum来安装MongoDB,具体可以参照官方网站上给出的说明。
源代码构建安装
-
安装Python 3.6。
Terminal window [root ~]# yum install gcc[root ~]# wget https://www.python.org/ftp/python/3.6.5/Python-3.6.5.tgz[root ~]# gunzip Python-3.6.5.tgz[root ~]# tar -xvf Python-3.6.5.tar[root ~]# cd Python-3.6.5[root ~]# ./configure --prefix=/usr/local/python36 --enable-optimizations[root ~]# yum -y install zlib-devel bzip2-devel openssl-devel ncurses-devel sqlite-devel readline-devel tk-devel gdbm-devel db4-devel libpcap-devel xz-devel[root ~]# make && make install...[root ~]# ln -s /usr/local/python36/bin/python3.6 /usr/bin/python3[root ~]# python3 --versionPython 3.6.5[root ~]# python3 -m pip install -U pip[root ~]# pip3 --version说明:上面在安装好Python之后还需要注册PATH环境变量,将Python安装路径下bin文件夹的绝对路径注册到PATH环境变量中。注册环境变量可以修改用户主目录下的.bash_profile或者/etc目录下的profile文件,二者的区别在于前者相当于是用户环境变量,而后者相当于是系统环境变量。
-
安装Redis-3.2.12。
Terminal window [root ~]# wget http://download.redis.io/releases/redis-3.2.12.tar.gz[root ~]# gunzip redis-3.2.12.tar.gz[root ~]# tar -xvf redis-3.2.12.tar[root ~]# cd redis-3.2.12[root ~]# make && make install[root ~]# redis-server --versionRedis server v=3.2.12 sha=00000000:0 malloc=jemalloc-4.0.3 bits=64 build=5bc5cd3c03d6ceb6[root ~]# redis-cli --versionredis-cli 3.2.12
配置服务
我们可以Linux系统下安装和配置各种服务,也就是说我们可以把Linux系统打造成数据库服务器、Web服务器、缓存服务器、文件服务器、消息队列服务器等等。Linux下的大多数服务都被设置为守护进程(驻留在系统后台运行,但不会因为服务还在运行而导致Linux无法停止运行),所以我们安装的服务通常名字后面都有一个字母d,它是英文单词daemon的缩写,例如:防火墙服务叫firewalld,我们之前安装的MySQL服务叫mysqld,Apache服务器叫httpd等。在安装好服务之后,可以使用systemctl命令或service命令来完成对服务的启动、停止等操作,具体操作如下所示。
-
启动防火墙服务。
Terminal window [root ~]# systemctl start firewalld -
终止防火墙服务。
Terminal window [root ~]# systemctl stop firewalld -
重启防火墙服务。
Terminal window [root ~]# systemctl restart firewalld -
查看防火墙服务状态。
Terminal window [root ~]# systemctl status firewalld -
设置/禁用防火墙服务开机自启。
Terminal window [root ~]# systemctl enable firewalldCreated symlink from /etc/systemd/system/dbus-org.fedoraproject.FirewallD1.service to /usr/lib/systemd/system/firewalld.service.Created symlink from /etc/systemd/system/multi-user.target.wants/firewalld.service to /usr/lib/systemd/system/firewalld.service.[root ~]# systemctl disable firewalldRemoved symlink /etc/systemd/system/multi-user.target.wants/firewalld.service.Removed symlink /etc/systemd/system/dbus-org.fedoraproject.FirewallD1.service.
计划任务
-
在指定的时间执行命令。
- at - 将任务排队,在指定的时间执行。
- atq - 查看待执行的任务队列。
- atrm - 从队列中删除待执行的任务。
指定3天以后下午5点要执行的任务。
Terminal window [root ~]# at 5pm+3daysat> rm -f /root/*.htmlat> <EOT>job 9 at Wed Jun 5 17:00:00 2019查看待执行的任务队列。
Terminal window [root ~]# atq9 Wed Jun 5 17:00:00 2019 a root从队列中删除指定的任务。
Terminal window [root ~]$ atrm 9 -
计划任务表 - crontab。
Terminal window [root ~]# crontab -e* * * * * echo "hello, world!" >> /root/hello.txt59 23 * * * rm -f /root/*.log说明:输入
crontab -e命令会打开vim来编辑Cron表达式并指定触发的任务,上面我们定制了两个计划任务,一个是每分钟向/root目录下的hello.txt中追加输出hello, world!;另一个是每天23时59分执行删除/root目录下以log为后缀名的文件。如果不知道Cron表达式如何书写,可以参照/etc/crontab文件中的提示(下面会讲到)或者用搜索引擎找一下“Cron表达式在线生成器”来生成Cron表达式。和crontab相关的文件在
/etc目录下,通过修改/etc目录下的crontab文件也能够定制计划任务。Terminal window [root ~]# cd /etc[root etc]# ls -l | grep cron-rw-------. 1 root root 541 Aug 3 2017 anacrontabdrwxr-xr-x. 2 root root 4096 Mar 27 11:56 cron.ddrwxr-xr-x. 2 root root 4096 Mar 27 11:51 cron.daily-rw-------. 1 root root 0 Aug 3 2017 cron.denydrwxr-xr-x. 2 root root 4096 Mar 27 11:50 cron.hourlydrwxr-xr-x. 2 root root 4096 Jun 10 2014 cron.monthly-rw-r--r-- 1 root root 493 Jun 23 15:09 crontabdrwxr-xr-x. 2 root root 4096 Jun 10 2014 cron.weekly[root etc]# vim crontab1 SHELL=/bin/bash2 PATH=/sbin:/bin:/usr/sbin:/usr/bin3 MAILTO=root45 # For details see man 4 crontabs67 # Example of job definition:8 # .---------------- minute (0 - 59)9 # | .------------- hour (0 - 23)10 # | | .---------- day of month (1 - 31)11 # | | | .------- month (1 - 12) OR jan,feb,mar,apr ...12 # | | | | .---- day of week (0 - 6) (Sunday=0 or 7) OR sun,mon,tue,wed,thu,fri,sat13 # | | | | |14 # * * * * * user-name command to be executed
网络访问和管理
-
安全远程连接 - ssh。
Terminal window [root ~]$ ssh root@120.77.222.217The authenticity of host '120.77.222.217 (120.77.222.217)' can't be established.ECDSA key fingerprint is SHA256:BhUhykv+FvnIL03I9cLRpWpaCxI91m9n7zBWrcXRa8w.ECDSA key fingerprint is MD5:cc:85:e9:f0:d7:07:1a:26:41:92:77:6b:7f:a0:92:65.Are you sure you want to continue connecting (yes/no)? yesWarning: Permanently added '120.77.222.217' (ECDSA) to the list of known hosts.root@120.77.222.217's password: -
通过网络获取资源 - wget。
- -b 后台下载模式
- -O 下载到指定的目录
- -r 递归下载
-
发送和接收邮件 - mail。
-
网络配置工具(旧) - ifconfig。
Terminal window [root ~]# ifconfig eth0eth0: flags=4163<UP,BROADCAST,RUNNING,MULTICAST> mtu 1500inet 172.18.61.250 netmask 255.255.240.0 broadcast 172.18.63.255ether 00:16:3e:02:b6:46 txqueuelen 1000 (Ethernet)RX packets 1067841 bytes 1296732947 (1.2 GiB)RX errors 0 dropped 0 overruns 0 frame 0TX packets 409912 bytes 43569163 (41.5 MiB)TX errors 0 dropped 0 overruns 0 carrier 0 collisions -
网络配置工具(新) - ip。
Terminal window [root ~]# ip address1: lo: <LOOPBACK,UP,LOWER_UP> mtu 65536 qdisc noqueue state UNKNOWN qlen 1link/loopback 00:00:00:00:00:00 brd 00:00:00:00:00:00inet 127.0.0.1/8 scope host lovalid_lft forever preferred_lft forever2: eth0: <BROADCAST,MULTICAST,UP,LOWER_UP> mtu 1500 qdisc pfifo_fast state UP qlen 1000link/ether 00:16:3e:02:b6:46 brd ff:ff:ff:ff:ff:ffinet 172.18.61.250/20 brd 172.18.63.255 scope global eth0valid_lft forever preferred_lft forever -
网络可达性检查 - ping。
Terminal window [root ~]# ping www.baidu.com -c 3PING www.a.shifen.com (220.181.111.188) 56(84) bytes of data.64 bytes from 220.181.111.188 (220.181.111.188): icmp_seq=1 ttl=51 time=36.3 ms64 bytes from 220.181.111.188 (220.181.111.188): icmp_seq=2 ttl=51 time=36.4 ms64 bytes from 220.181.111.188 (220.181.111.188): icmp_seq=3 ttl=51 time=36.4 ms--- www.a.shifen.com ping statistics ---3 packets transmitted, 3 received, 0% packet loss, time 2002msrtt min/avg/max/mdev = 36.392/36.406/36.427/0.156 ms -
显示或管理路由表 - route。
-
查看网络服务和端口 - netstat / ss。
Terminal window [root ~]# netstat -nap | grep nginx -
网络监听抓包 - tcpdump。
-
安全文件拷贝 - scp。
[root ~]# scp root@1.2.3.4:/root/guido.jpg hellokitty@4.3.2.1:/home/hellokitty/pic.jpg-
文件同步工具 - rsync。
说明:使用
rsync可以实现文件的自动同步,这个对于文件服务器来说相当重要。关于这个命令的用法,我们在后面讲项目部署的时候为大家详细说明。 -
安全文件传输 - sftp。
Terminal window [root ~]# sftp root@1.2.3.4root@1.2.3.4's password:Connected to 1.2.3.4.sftp>-
help:显示帮助信息。 -
ls/lls:显示远端/本地目录列表。 -
cd/lcd:切换远端/本地路径。 -
mkdir/lmkdir:创建远端/本地目录。 -
pwd/lpwd:显示远端/本地当前工作目录。 -
get:下载文件。 -
put:上传文件。 -
rm:删除远端文件。 -
bye/exit/quit:退出sftp。
-
进程管理
-
查看进程 - ps。
Terminal window [root ~]# ps -efUID PID PPID C STIME TTY TIME CMDroot 1 0 0 Jun23 ? 00:00:05 /usr/lib/systemd/systemd --switched-root --system --deserialize 21root 2 0 0 Jun23 ? 00:00:00 [kthreadd]...[root ~]# ps -ef | grep mysqldroot 4943 4581 0 22:45 pts/0 00:00:00 grep --color=auto mysqldmysql 25257 1 0 Jun25 ? 00:00:39 /usr/sbin/mysqld --daemonize --pid-file=/var/run/mysqld/mysqld.pid -
显示进程状态树 - pstree。
Terminal window [root ~]# pstreesystemd─┬─AliYunDun───18*[{AliYunDun}]├─AliYunDunUpdate───3*[{AliYunDunUpdate}]├─2*[agetty]├─aliyun-service───2*[{aliyun-service}]├─atd├─auditd───{auditd}├─dbus-daemon├─dhclient├─irqbalance├─lvmetad├─mysqld───28*[{mysqld}]├─nginx───2*[nginx]├─ntpd├─polkitd───6*[{polkitd}]├─rsyslogd───2*[{rsyslogd}]├─sshd───sshd───bash───pstree├─systemd-journal├─systemd-logind├─systemd-udevd└─tuned───4*[{tuned}] -
查找与指定条件匹配的进程 - pgrep。
Terminal window [root ~]$ pgrep mysqld3584 -
通过进程号终止进程 - kill。
Terminal window [root ~]$ kill -l1) SIGHUP 2) SIGINT 3) SIGQUIT 4) SIGILL 5) SIGTRAP6) SIGABRT 7) SIGBUS 8) SIGFPE 9) SIGKILL 10) SIGUSR111) SIGSEGV 12) SIGUSR2 13) SIGPIPE 14) SIGALRM 15) SIGTERM16) SIGSTKFLT 17) SIGCHLD 18) SIGCONT 19) SIGSTOP 20) SIGTSTP21) SIGTTIN 22) SIGTTOU 23) SIGURG 24) SIGXCPU 25) SIGXFSZ26) SIGVTALRM 27) SIGPROF 28) SIGWINCH 29) SIGIO 30) SIGPWR31) SIGSYS 34) SIGRTMIN 35) SIGRTMIN+1 36) SIGRTMIN+2 37) SIGRTMIN+338) SIGRTMIN+4 39) SIGRTMIN+5 40) SIGRTMIN+6 41) SIGRTMIN+7 42) SIGRTMIN+843) SIGRTMIN+9 44) SIGRTMIN+10 45) SIGRTMIN+11 46) SIGRTMIN+12 47) SIGRTMIN+1348) SIGRTMIN+14 49) SIGRTMIN+15 50) SIGRTMAX-14 51) SIGRTMAX-13 52) SIGRTMAX-1253) SIGRTMAX-11 54) SIGRTMAX-10 55) SIGRTMAX-9 56) SIGRTMAX-8 57) SIGRTMAX-758) SIGRTMAX-6 59) SIGRTMAX-5 60) SIGRTMAX-4 61) SIGRTMAX-3 62) SIGRTMAX-263) SIGRTMAX-1 64) SIGRTMAX[root ~]# kill 1234[root ~]# kill -9 1234 -
通过进程名终止进程 - killall / pkill。
结束名为mysqld的进程。
Terminal window [root ~]# pkill mysqld结束hellokitty用户的所有进程。
Terminal window [root ~]# pkill -u hellokitty说明:这样的操作会让hellokitty用户和服务器断开连接。
-
将进程置于后台运行。
Ctrl+Z- 快捷键,用于停止进程并置于后台。&- 将进程置于后台运行。
Terminal window [root ~]# mongod &[root ~]# redis-server...^Z[4]+ Stopped redis-server -
查询后台进程 - jobs。
Terminal window [root ~]# jobs[2] Running mongod &[3]- Stopped cat[4]+ Stopped redis-server -
让进程在后台继续运行 - bg。
Terminal window [root ~]# bg %4[4]+ redis-server &[root ~]# jobs[2] Running mongod &[3]+ Stopped cat[4]- Running redis-server & -
将后台进程置于前台 - fg。
Terminal window [root ~]# fg %4redis-server说明:置于前台的进程可以使用
Ctrl+C来终止它。 -
调整程序/进程运行时优先级 - nice / renice。
-
用户登出后进程继续工作 - nohup。
Terminal window [root ~]# nohup ping www.baidu.com > result.txt & -
跟踪进程系统调用情况 - strace。
Terminal window [root ~]# pgrep mysqld8803[root ~]# strace -c -p 8803strace: Process 8803 attached^Cstrace: Process 8803 detached% time seconds usecs/call calls errors syscall------ ----------- ----------- --------- --------- ----------------99.18 0.005719 5719 1 restart_syscall0.49 0.000028 28 1 mprotect0.24 0.000014 14 1 clone0.05 0.000003 3 1 mmap0.03 0.000002 2 1 accept------ ----------- ----------- --------- --------- ----------------100.00 0.005766 5 total说明:这个命令的用法和参数都比较复杂,建议大家在真正用到这个命令的时候再根据实际需要进行了解。
-
查看当前运行级别 - runlevel。
Terminal window [root ~]# runlevelN 3 -
实时监控进程占用资源状况 - top。
Terminal window [root ~]# toptop - 23:04:23 up 3 days, 14:10, 1 user, load average: 0.00, 0.01, 0.05Tasks: 65 total, 1 running, 64 sleeping, 0 stopped, 0 zombie%Cpu(s): 0.3 us, 0.3 sy, 0.0 ni, 99.3 id, 0.0 wa, 0.0 hi, 0.0 si, 0.0 stKiB Mem : 1016168 total, 191060 free, 324700 used, 500408 buff/cacheKiB Swap: 0 total, 0 free, 0 used. 530944 avail Mem...-c- 显示进程的整个路径。-d- 指定两次刷屏之间的间隔时间(秒为单位)。-i- 不显示闲置进程或僵尸进程。-p- 显示指定进程的信息。
系统诊断
-
系统启动异常诊断 - dmesg。
-
查看系统活动信息 - sar。
Terminal window [root ~]# sar -u -r 5 10Linux 3.10.0-957.10.1.el7.x86_64 (izwz97tbgo9lkabnat2lo8z) 06/02/2019 _x86_64_ (2 CPU)06:48:30 PM CPU %user %nice %system %iowait %steal %idle06:48:35 PM all 0.10 0.00 0.10 0.00 0.00 99.8006:48:30 PM kbmemfree kbmemused %memused kbbuffers kbcached kbcommit %commit kbactive kbinact kbdirty06:48:35 PM 1772012 2108392 54.33 102816 1634528 784940 20.23 793328 1164704 0-A- 显示所有设备(CPU、内存、磁盘)的运行状况。-u- 显示所有CPU的负载情况。-d- 显示所有磁盘的使用情况。-r- 显示内存的使用情况。-n- 显示网络运行状态。
-
查看内存使用情况 - free。
Terminal window [root ~]# freetotal used free shared buff/cache availableMem: 1016168 323924 190452 356 501792 531800Swap: 0 0 0 -
虚拟内存统计 - vmstat。
Terminal window [root ~]# vmstatprocs -----------memory---------- ---swap-- -----io---- -system-- ------cpu-----r b swpd free buff cache si so bi bo in cs us sy id wa st2 0 0 204020 79036 667532 0 0 5 18 101 58 1 0 99 0 0 -
CPU信息统计 - mpstat。
Terminal window [root ~]# mpstatLinux 3.10.0-957.5.1.el7.x86_64 (iZ8vba0s66jjlfmo601w4xZ) 05/30/2019 _x86_64_ (1 CPU)01:51:54 AM CPU %usr %nice %sys %iowait %irq %soft %steal %guest %gnice %idle01:51:54 AM all 0.71 0.00 0.17 0.04 0.00 0.00 0.00 0.00 0.00 99.07 -
查看进程使用内存状况 - pmap。
Terminal window [root ~]# psPID TTY TIME CMD4581 pts/0 00:00:00 bash5664 pts/0 00:00:00 ps[root ~]# pmap 45814581: -bash0000000000400000 884K r-x-- bash00000000006dc000 4K r---- bash00000000006dd000 36K rw--- bash00000000006e6000 24K rw--- [ anon ]0000000001de0000 400K rw--- [ anon ]00007f82fe805000 48K r-x-- libnss_files-2.17.so00007f82fe811000 2044K ----- libnss_files-2.17.so... -
报告设备CPU和I/O统计信息 - iostat。
Terminal window [root ~]# iostatLinux 3.10.0-693.11.1.el7.x86_64 (iZwz97tbgo9lkabnat2lo8Z) 06/26/2018 _x86_64_ (1 CPU)avg-cpu: %user %nice %system %iowait %steal %idle0.79 0.00 0.20 0.04 0.00 98.97Device: tps kB_read/s kB_wrtn/s kB_read kB_wrtnvda 0.85 6.78 21.32 2106565 6623024vdb 0.00 0.01 0.00 2088 0 -
显示所有PCI设备 - lspci。
Terminal window [root ~]# lspci00:00.0 Host bridge: Intel Corporation 440FX - 82441FX PMC [Natoma] (rev 02)00:01.0 ISA bridge: Intel Corporation 82371SB PIIX3 ISA [Natoma/Triton II]00:01.1 IDE interface: Intel Corporation 82371SB PIIX3 IDE [Natoma/Triton II]00:01.2 USB controller: Intel Corporation 82371SB PIIX3 USB [Natoma/Triton II] (rev 01)00:01.3 Bridge: Intel Corporation 82371AB/EB/MB PIIX4 ACPI (rev 03)00:02.0 VGA compatible controller: Cirrus Logic GD 544600:03.0 Ethernet controller: Red Hat, Inc. Virtio network device00:04.0 Communication controller: Red Hat, Inc. Virtio console00:05.0 SCSI storage controller: Red Hat, Inc. Virtio block device00:06.0 SCSI storage controller: Red Hat, Inc. Virtio block device00:07.0 Unclassified device [00ff]: Red Hat, Inc. Virtio memory balloon -
显示进程间通信设施的状态 - ipcs。
Terminal window [root ~]# ipcs------ Message Queues --------key msqid owner perms used-bytes messages------ Shared Memory Segments --------key shmid owner perms bytes nattch status------ Semaphore Arrays --------key semid owner perms nsems
Shell编程
之前我们提到过,Shell是一个连接用户和操作系统的应用程序,它提供了人机交互的界面(接口),用户通过这个界面访问操作系统内核的服务。Shell脚本是一种为Shell编写的脚本程序,我们可以通过Shell脚本来进行系统管理,同时也可以通过它进行文件操作。总之,编写Shell脚本对于使用Linux系统的人来说,应该是一项标配技能。
互联网上有大量关于Shell脚本的相关知识,我不打算再此对Shell脚本做一个全面系统的讲解,我们通过下面的代码来感性的认识下Shell脚本就行了。
例子1:输入两个整数m和n,计算从m到n的整数求和的结果。
#!/usr/bin/bashprintf 'm = 'read mprintf 'n = 'read na=$msum=0while [ $a -le $n ]do sum=$[ sum + a ] a=$[ a + 1 ]doneecho '结果: '$sum例子2:自动创建文件夹和指定数量的文件。
#!/usr/bin/bashprintf '输入文件夹名: 'read dirprintf '输入文件名: 'read fileprintf '输入文件数量(<1000): 'read numif [ $num -ge 1000 ]then echo '文件数量不能超过1000'else if [ -e $dir -a -d $dir ] then rm -rf $dir else if [ -e $dir -a -f $dir ] then rm -f $dir fi fi mkdir -p $dir index=1 while [ $index -le $num ] do if [ $index -lt 10 ] then pre='00' elif [ $index -lt 100 ] then pre='0' else pre='' fi touch $dir'/'$file'_'$pre$index index=$[ index + 1 ] donefi例子3:自动安装指定版本的Redis。
#!/usr/bin/bashinstall_redis() { if ! which redis-server > /dev/null then cd /root wget $1$2'.tar.gz' >> install.log gunzip /root/$2'.tar.gz' tar -xf /root/$2'.tar' cd /root/$2 make >> install.log make install >> install.log echo '安装完成' else echo '已经安装过Redis' fi}
install_redis 'http://download.redis.io/releases/' $1相关资源
-
Linux命令行常用快捷键
快捷键 功能说明 tab 自动补全命令或路径 Ctrl+a 将光标移动到命令行行首 Ctrl+e 将光标移动到命令行行尾 Ctrl+f 将光标向右移动一个字符 Ctrl+b 将光标向左移动一个字符 Ctrl+k 剪切从光标到行尾的字符 Ctrl+u 剪切从光标到行首的字符 Ctrl+w 剪切光标前面的一个单词 Ctrl+y 复制剪切命名剪切的内容 Ctrl+c 中断正在执行的任务 Ctrl+h 删除光标前面的一个字符 Ctrl+d 退出当前命令行 Ctrl+r 搜索历史命令 Ctrl+g 退出历史命令搜索 Ctrl+l 清除屏幕上所有内容在屏幕的最上方开启一个新行 Ctrl+s 锁定终端使之暂时无法输入内容 Ctrl+q 退出终端锁定 Ctrl+z 将正在终端执行的任务停下来放到后台 !! 执行上一条命令 !数字 执行数字对应的历史命令 !字母 执行最近的以字母打头的命令 !$ / Esc+. 获得上一条命令最后一个参数 Esc+b 移动到当前单词的开头 Esc+f 移动到当前单词的结尾 -
man查阅命令手册的内容说明
手册中的标题 功能说明 NAME 命令的说明和介绍 SYNOPSIS 使用该命令的基本语法 DESCRIPTION 使用该命令的详细描述,各个参数的作用,有时候这些信息会出现在OPTIONS中 OPTIONS 命令相关参数选项的说明 EXAMPLES 使用该命令的参考例子 EXIT STATUS 命令结束的退出状态码,通常0表示成功执行 SEE ALSO 和命令相关的其他命令或信息 BUGS 和命令相关的缺陷的描述 AUTHOR 该命令的作者介绍
Python100天
已完结分享文章
生成精美分享图或复制链接,与更多人分享本文。
继续阅读
换条路线
从其他文章中稳定抽取
最后更新于 ,距今已过 301 天
部分内容可能已过时
评论